BRAKE BOOSTER OPERATION CHECK
INSPECTION WITHOUT USING TESTER |
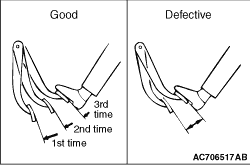 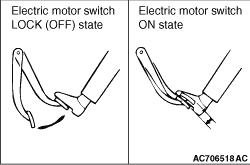 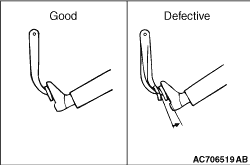 |
1.Carry out the simplified brake booster operation check in the following procedure: (1) Turn the electric motor switch to the ON position. After waiting for 1 to 2 minutes, turn the electric motor switch to the OFF position. Depress the brake pedal with normal depression force. The result is judged as "Good" when the pedal stroke is great at the first depression, and becomes smaller as you repeat depressing the pedal. If the pedal stroke does not change, the result is judged as "No Good." (2) With the electric motor switch turned to the LOCK (OFF) position, depress the brake pedal for several times. Then, with the brake pedal depressed, turn the electric motor switch to the ON position. The pedal should move down slightly.If the pedal does not move down, the result is judged as "No Good". (3) With the electric motor switch turned to the ON position, depress the brake pedal. Turn the electric motor switch to the LOCK (OFF) position with the pedal depressed. The pedal height should remain for approximately 30 seconds.If the pedal moves up, it is defective. 2.The main functions are judged normal when the results of all the above three checks are "Good". When one or more of the above three check results is "No Good", then the check valve, vacuum hose, brake booster, or brake electric vacuum pump is suspected faulty. |
INSPECTION USING SIMPLIFIED TESTER |
1.Before starting this inspection, remove the brake booster vacuum hose connected to
the vehicle, and check the operation of check valve (refer to  ). ). |
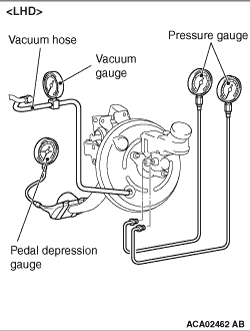 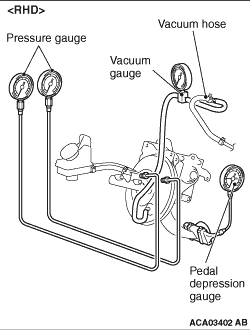 |
2.After inspecting the vacuum hose check valve, connect the vacuum hose to the vacuum gauge.
To the vacuum gauge and brake booster, connect another vacuum hose to which a check valve is
not inserted. Connect the pressure gauge and pedal depression gauge as shown in the figure.
Bleed the pressure gauge and then perform the following tests. (1) Airtightness test with no load Set the electric motor switch to the ON position. When the vacuum gauge reading reaches approximately -80 kPa, turn the electric motor switch to the LOCK (OFF) position. The result is judged as "Good" when the drop of the vacuum for approximately 15 seconds after the electric motor switch is turned to LOCK (OFF) position is within -3.3 kPa. (2) Airtightness test with load Set the electric motor switch to the ON position. Record the vacuum pressure value when the brake pedal is depressed with 200 N pedal depression force. Then, turn the electric motor switch to the LOCK (OFF) position. The result is judged as "Good" when the drop of the vacuum for approximately 15 seconds after the electric motor switch is turned to LOCK (OFF) position is -3.3 kPa or less of the recorded value. When one or more of the above check results are judged as "No Good," the vacuum hose or brake booster is suspected faulty. (3) Brake booster characteristics test Perform this test after the above (1) and (2) were performed. .....1. Non-servo effect test With the electric motor switch turned to the LOCK (OFF) position, make sure that the vacuum gauge reading is 0 kPa. Then, depress the brake pedal with 100 N and 300 N, and measure respectively the fluid pressure generated. Standard value:
Set the electric motor switch to the ON position. Then, when the vacuum gauge reads approximately -80 kPa, depress the brake pedal with 100 N and 300 N, and measure respectively the fluid pressure generated. Standard value:
|
||||||||||||||||||||||||