REMOVAL AND INSTALLATION


caution
  • Disconnect the negative auxiliary battery terminal and wait for 60 seconds or more before starting work. Insulate the disconnected (-) terminal by wrapping the tape (Refer to the item 5 of Service Precautions ).
  • Never attempt to disassemble or repair the front impact sensor. If faulty, replace it with new one(s).
  • Handle the front impact sensor with sufficient caution, and do not drop the sensor or allow contact with water, oil, or others. If denting, cracking, or deformation is discovered, replace it with new one(s).
  • After deployment of an air bag, replace the front impact sensor with a new one.

Pre-removal operation
  • Electric motor switch to the LOCK (OFF) position.
  • Disconnect the negative auxiliary battery terminal.


Removal steps


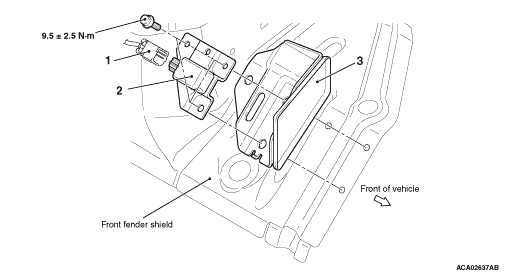
·
Headlamp (Refer to GROUP 54A, Headlamp).
<<A>>

1.
Front impact sensor connector


2.
Front impact sensor


3.
Front impact sensor bracket


Installation steps

>>A<<
·
Pre-installation inspection


3.
Front impact sensor bracket

>>B<<
2.
Front impact sensor


1.
Front impact sensor connector


·
Headlamp (Refer to GROUP 54A, Headlamp).


·
Connect the negative auxiliary battery terminal.

>>C<<
·
Post-installation inspection
note The figure indicates the left front impact sensor. The right impact sensor is symmetrical to this.

REMOVAL SERVICE POINT


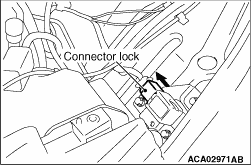
<<A>> FRONT IMPACT SENSOR CONNECTOR REMOVAL


Slide the connector lock of the front impact sensor harness connector to the direction of the arrow, then unlock and disconnect the connector.

INSTALLATION SERVICE POINTS


>>A<< PRE-INSTALLATION INSPECTION


Check the front impact sensor before installation (Refer to ).

>>B<< FRONT IMPACT SENSOR INSTALLATION


1.
caution If the front impact sensor is not securely and correctly installed, the correct operation of air bag and pre-tensioner is prevented.
Securely connect the connector.
2.Install the front impact sensor securely with the arrow on the front impact sensor label facing towards the front of the vehicle.

>>C<< POST-INSTALLATION INSPECTION


1.Electric motor switch to the "ON" position.

2.Check that the SRS warning lamp is illuminated for 6 to 8 seconds, and extinguished afterward.
3.If the lamp does not extinguish, perform the troubleshooting (Refer to ).