|
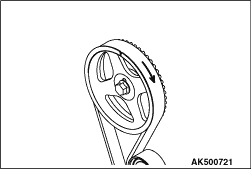
1.Using chalk, etc., mark an arrow on the back of the timing belt to indicate the direction
of rotation. This is to ensure correct installation of the belt in case it is reused.
|
|
|
Keep the auto-tensioner longitudinal. If it were kept lateral, it would possibly cause
aeration.
|

|
1.Use the special tool Injection pump sprocket holder (MB992048), hold the pump sprocket.
| caution |
Never strike the shaft or sprocket to remove the sprocket. This
may cause malfunction in the injection pump. Be sure to use a puller to remove the sprocket.
|
2.Remove the pump sprocket nut.
|

|
3.Use the special tool remove the pump sprocket.
- Injection pump sprocket puller (MB992098)
- Crank pulley puller (MB992099)
|

|
Use the special tool Crankshaft sprocket puller (MD998778), if the sprocket is stuck and
hard to remove.
|
|
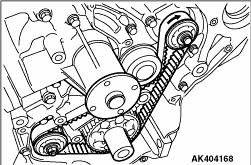
Using chalk, etc., mark an arrow on the back of the timing belt to indicate the direction
of rotation. This is to ensure correct installation of the belt in case it is reused.
| note |
Water or oil on the belt shortens its life drastically, so the removed timing belt, sprocket,
and tensioner must be free from oil and water. Do not immerse parts in cleaning solvent.
|
| note |
If there is oil or water on any part, check front case oil seals, camshaft oil seal and
water pump for leaks.
|
|

|
1.Remove the plug at the right side of the cylinder block.
2.Insert a Phillips screwdriver [shank diameter 8 mm] through the
plug hole and lock the balancer shaft.
3.Loosen the balancer shaft sprocket nut.
|
|
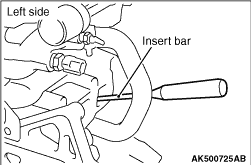
1.Insert a wrench extension bar or similar rod and lock the balancer shaft.
2.Loosen the balancer shaft sprocket bolt.
|

|
Use the special tool Crankshaft sprocket puller (MD998778), if the sprocket is stuck and
hard to remove.
|

|
Clean and then degrease the front face of the oil pump gear drive shaft, crankshaft sprocket
"B" and crankshaft surface on which sprocket "B" is attached.
| note |
Degreasing is necessary to prevent decrease in the friction between contacting surfaces.
|
|

|
Install the spacer with its chamfered end toward the oil seal.
|
|
1.Lock the balancer shaft in the same way as used in the removal procedure.
2.Install the balancer shaft sprocket and tighten the bolt to the specified torque of
36 ± 3 N·m.
|
|
1.Lock the balancer shaft in the same way as used in the removal procedure.
2.Install the balancer shaft sprocket and tighten the nut to the specified torque of
36 ± 3 N·m.
|
|
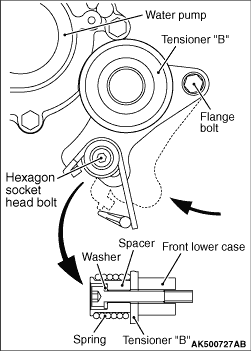
1.Install the tensioner, tensioner spring and spacer.
| note |
Be sure to install the tensioner spring with its shorter end toward the water pump.
|
2.Move tensioner "B" toward water pump and tighten mounting bolt.
|

|
1.Align timing marks on the crankshaft sprocket "B", and silent shaft sprockets with their
timing marks.
2.Install timing belt "B" onto sprockets and ensure that its tension side is not slack.
|

|
3.Loosen tensioner "B" mounting flange bolt, one to two turns.
4.Tighten the tensioner "B" attaching hexagon socket head bolt.
5.Tighten the tensioner "B" attaching flange bolt.
| note |
If the bolt is tightened first, the tensioner "B" should be turned together, resulting
in reduced timing belt "B" tension.
|
|

|
6.Ensure that the deflection is as specified when the belt is pushed by the index finger
at the position indicated by an arrow.
Belt deflection: 4 - 5 mm
|

|
1.Clean and then degrease the following surfaces and parts: Sprocket mounting surface of
crankshaft, flange, and crankshaft sprocket.
| note |
Degreasing is necessary to prevent decrease in the friction between contacting surfaces.
|
2.Clean the crankshaft contacting surface of the crankshaft sprocket.
3.Install the flange, aligning a timing mark on a front lower case with that on the
flange.
|
|
1.Use the special tool Injection pump sprocket holder (MB992048) to prevent the pump sprocket
from rotating.
2.Tighten the pump sprocket nut to the specified torque of 64 ± 5 N·m.
|
|
|
1.

Align the timing marks on each sprocket.
|

|
2.In accordance with the following procedure, install a timing belt not to be slack.
crankshaft sprocket → idler pulley → pump sprocket → idler pulley → camshaft
sprocket → tensioner pulley
| note |
When the timing belt is installed into the crankshaft sprocket, install the timing belt
after sliding the crankshaft sprocket to around the key end. (Pay attention to the notch on
the crankshaft sprocket not to be damaged at the timing belt installation.) And then, install
the crankshaft sprocket in position.
|
3.Confirm the timing marks on each sprocket are in position.
| caution |
Check that the glow plugs, glow plug mounting threads and
plug seating surfaces of cylinder head are dry.
|
4.When installing the glow plug, screw in one thread or more with fingers and then tighten
with a tool.
5.Tighten the glow plugs to 9.0 ± 1.0 N·m.
|

|
6.Using the special tool Angle gauge (MB991614), tighten the glow plug to a further 30° to
40°.
7.Install a glow plug plate to the glow plug, and then tighten them to the specified
torque of 1.8 ± 0.2 N·m.
8.Pull out the set pin of an auto tensioner.
9.Turn the crankshaft twice in a clockwise direction and measure the protrusion height
of the auto tensioner.
Standard value: 2.3 - 7.6 mm
10.Confirm the timing marks on each sprocket are in position.
|
|
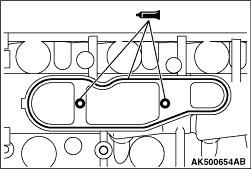
1.Clean both mating surfaces of cover and cylinder block.
2.Apply a 2.3 ± 1.0 mm wide bead of sealant to the cylinder block.
Specified sealant:
Three bond 1217G or equivalent
|

|
3.Coat the bolt with sealant, then install and tighten it.
Specified sealant:
Three bond 2310 or equivalent
|

