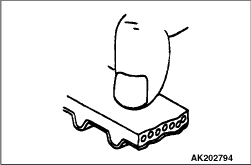
INSPECTION
TIMING BELTS |
| The timing belts must be checked closely. Should the following defects be evident, replace
the belt with a new one. |
 |
1.Hardened back surface rubber. Glossy, non-elastic, and so hard that no mark is produced even when scratched by fingernails. |
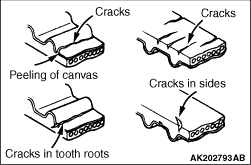 |
2.Cracked back surface rubber. 3.Cracked or separated canvas. 4.Cracked tooth bottom. 5.Cracked side. |
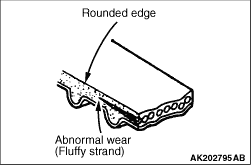 |
6.Abnormal wear on side.
|
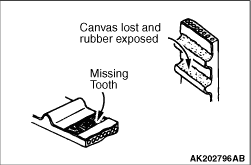 |
7.Abnormal wear in teeth.
Canvas on load side tooth flank worn (Fluffy canvas fibres, rubber gone and colour changed to white, and unclear canvas texture) Last stage: Canvas on load side tooth flank worn down and rubber exposed (tooth width reduced) |
AUTO-TENSIONER |
| 1.Check the auto-tensioner for leaks from the sealed sections. Replace it if leaky. |
| 2.Check the rod end for wear and other damage. Replace the auto-tensioner if the rod is badly worn or damaged. |
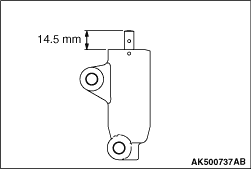 |
3.Measure the extension length of the rod. If it is not within the standard value range, replace the auto-tensioner. Standard value: 14.5 mm 4.Measure the amount of the retraction when the rod is pressed with the force of 100 - 200 N. If it deviates from the standard value, replace the auto tensioner. Standard value: within 1.0 mm |
AIR BLEEDING PROCEDURE OF AUTO-TENSIONER |
| When the auto tensioner is not kept with its rod upward, or when the set pin having Φ2
mm is pulled out before the installation to the engine, carry out the air bleeding as follows. |
|
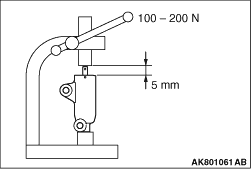 |
1.Set the auto tensioner to the longitudinal type press as shown in the illustration. 2.Slowly press down the rod, two or three times, to the cylinder end plane. 3.When the rod protrusion has approximately 5 mm, apply the load of 100 - 200 N. Check whether the auto tensioner has sufficient stiffness. 4.If the auto tensioner does not have sufficient stiffness, replace the auto tensioner. 5.Slowly pressing down the rod, insert the set pin having Φ2mm through the hole to fix the auto tensioner.
|