REMOVAL AND INSTALLATION <2WD (High rider), 4WD>


Pre-removal Operation
  • Loosening the parking brake cable adjusting nut (Refer to GROUP 36 - On-vehicle Service, Parking Brake Lever Stroke Check and Adjustment ).
  • Brake fluid draining

Post-installation Operation
  • Brake fluid filling and air bleeding (Refer to ).
  • Parking brake lever stroke adjustment (Refer to GROUP 36 - On-vehicle Service, Parking Brake Lever Stroke Check and Adjustment ).<Vehicles with front separate seat>
  • Parking brake pull rod stroke adjustment (Refer to GROUP 36 - On-vehicle Service, Parking Brake Pull Rod Stroke Adjustment ).<Vehicles with front bench seat>


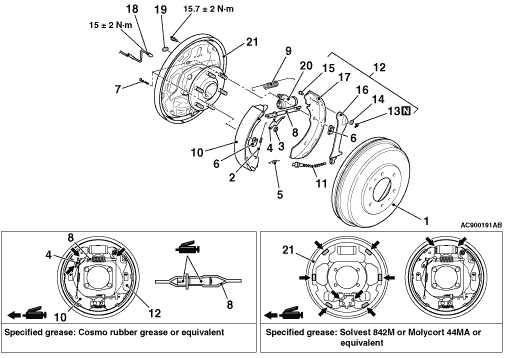
Removal steps


1.
Brake drum


2.
Shoe lever spring


3.
Snap ring


4.
Adjuster lever


5.
Anchor spring


6.
Shoe hold-down spring


7.
Shoe hold-down pin


8.
Auto adjuster assembly


9.
Piston spring


10.
Shoe and lining assembly


11.
Parking brake cable connection


12.
Shoe and lever assembly
<<A>>
>>B<<
13.
Retainer

>>A<<
14.
Wave washer


15.
Pin


16.
Parking brake lever


17.
Shoe and lining assembly


18.
Brake pipe connection


19.
Plug


20.
Wheel cylinder assembly


21.
Backing plate (Refer to GROUP 27 - Axle Shaft Assembly ).

REMOVAL SERVICE POINT


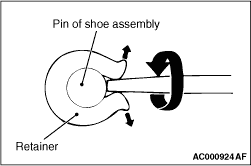
<<A>> RETAINER REMOVAL


Use a flat-tipped screwdriver or a similar tool to open up the retainer joint. Then remove the retainer.

INSTALLATION SERVICE POINTS


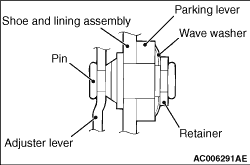
>>A<< WAVE WASHER INSTALLATION


Install the wave washer in the direction shown in the illustration.

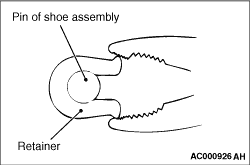
>>B<< RETAINER INSTALLATION


Use pliers or a similar tool to close the retainer end onto the pin.