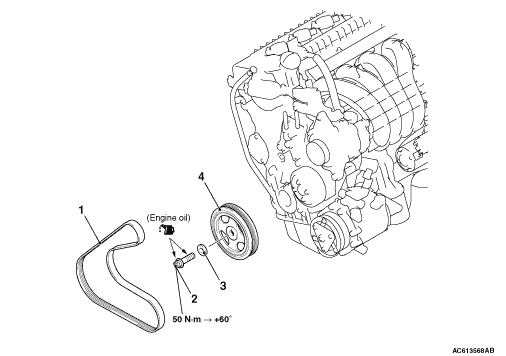
|
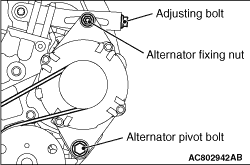
1.Loosen the nut for alternator pivot bolt and alternator fixing nut.
2.
| caution |
To reuse the alternator and others belt, draw an arrow indicating
the rotating direction (clockwise) on the back of the belt using chalk, etc.
|
Turn the adjusting bolt in the anti-clockwise direction to remove the alternator and others
belt.
|
|
|
Use the used alternator and others belt to fix the crankshaft pulley in the following
procedures, and remove the crankshaft pulley centre bolt.
|
|
1.
| caution |
- Do not use the alternator and others belt set up on the vehicles.
- Do not use a cracked or damaged alternator and others belt.
|
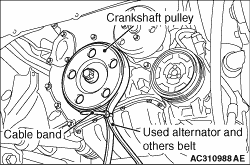
Set the used alternator and others belt as shown and hold it with a cable band.
|
|
2.
| caution |
Do not hang the used alternator and others belt for the crankshaft
rotation stopper on the water pump pulley.
|
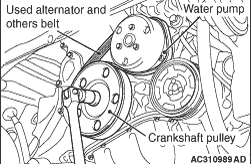
Turning the crankshaft pulley to the anti-clockwise direction, loop the used Alternator
and others belt around the water pump body.
3.Hold the crankshaft pulley and remove the crankshaft pulley centre bolt.
|
|
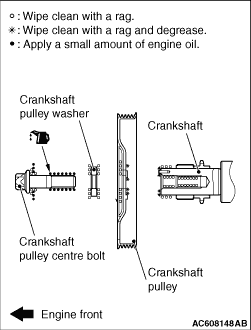
1.Wipe off the dirt on the crankshaft and the crankshaft pulley as shown in the figure using
a rag.
2.After wiping off the dirt on the crankshaft and crankshaft pulley as shown in the
figure using a rag, degrease the areas.
| note |
Degrease them to prevent drop in the friction coefficient of the pressed area which is
caused by oil adhesion.
|
3.Install the crankshaft pulley.
4.Wipe off the dirt on the crankshaft pulley washer and the crankshaft pulley centre
bolt as shown in the figure using a rag.
5.Apply an adequate and minimum amount of engine oil to the thread
of the crankshaft pulley centre bolt and the lower area of the flange.
|
|
6.
| caution |
- Do not use the alternator and others belt setup on the vehicles.
- Do not use a cracked or damaged alternator and others belt.
|
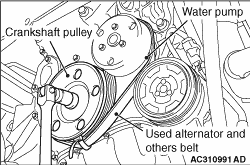
Set the used alternator and others belt and hold it with a cable band as during removal.
|
|
7.
| caution |
Do not hang the used alternator and others belt for the crankshaft
rotation stopper on the water pump pulley.
|
Turning the crankshaft pulley to the clockwise direction, loop the used alternator and
others belt around the water pump body.
8.Hold the crankshaft pulley and tighten the crankshaft pulley centre bolt to the specified
torque 50 N·m.
|
|
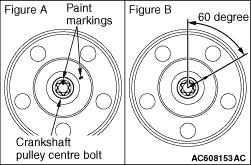
9.As shown in figure A, put a paint mark on one angle of the crankshaft pulley centre bolt.
Then, put a paint mark on the crankshaft pulley on the extended line of the angle next to the
marked angle.
10.
| caution |
- Tighten the bolt carefully
as it will not be tightened sufficiently if the tightening angle is less than 60 degree.
- If the tightening angle exceeds 60 degree, loosen the bolt completely and repeat
the steps from the start.
|
Tighten the crankshaft pulley centre bolt in a 60 degree angle, and check that the paint
mark on the crankshaft pulley centre bolt aligns with the paint mark on the crankshaft pulley
as shown in figure B.
|