
|
1.Use special tool oil filter wrench (MB991396) to remove the oil filter.
|
|
|
1.Remove oil pan tightening bolts.
|

|
2.
| caution |
Lightly tap the oil pan FIPG cutter to drive in, taking care not to damage
the ladder frame and oil pan sealed area.
|
Lightly tap special tool oil pan FIPG cutter (MD998727) to drive in the illustrated groove
of the oil pan and ladder frame.
|

|
3.Lightly tap and slide special tool oil pan FIPG cutter (MD998727) to remove the oil pan.
|

|
If the timing chain case is difficult to remove, insert a hammer handle as shown in the
illustration and lightly pry it.
|
|
|
1.
| caution |
- Be sure to remove the liquid gasket entering
the mounting holes, the O-ring grooves and the cylinder gasket clearance.
- Sufficiently check whether there is no residual oil on the place where degreasing
is performed using white gasoline, such as the surface where the FIPG is applied and stays,
or the chamfered area.
- Do not touch the area where degreasing must be performed since the oils from your
fingers will harm the seal ability.
|
Use white gasoline to completely remove the liquid gasket adhering to the timing chain
case, the cylinder block and the cylinder head.
|
|
|
2.Completely remove the sealant remaining on the 3-plane contact surface among the cylinder
head, the cylinder block and the gasket. Using white gasoline, carry out the degresing
|
|
|
3.

| caution |
Install the timing chain case within three minutes after
applying the liquid gasket.
|
Apply liquid gasket of 2.5 ±
0.5 mm in thickness to the timing chain case. For
the place "D" shown in the illustration, however, apply the liquid gasket whose diameter is
4.5 ±
0.5 mm or pile up the liquid gasket of 2.5 ±
0.5 mm as shown in the
illustration.
Specified sealant:
Three bond 1217G or equivalent
|

|
4.The engine oil staying at the cylinder gasket oozes to the 3-plane contact surface described
in Step 2 and 3. Swiftly apply the liquid gasket to this area after degreasing.
Specified sealant:
Three bond 1217G or equivalent
|

|
5.Tighten timing chain case mounting bolts to the specified torque.
Tightening torque
A: 24 ±
4 N·m
B: 10 ±
2 N·m
C: 10 ±
2 N·m
D: 13 ±
1 N·m
|

|
1.Apply a small amount of engine oil to the entire inner diameter of the front oil seal
lip.
| caution |
The front oil seal must not be a strong press fit. The strong
press fit can possibly cause the oil leakage, damaging the front oil seal.
|
2.Use special tool Bush remover and installer base (MB991448) in order to press-fit
the front oil seal into the timing chain case as shown in the illustration.
|
|
|
1.Completely remove liquid gasket adhering to the cylinder block and oil pan.
|

|
2.Using white gasoline and so on, degrease the cylinder block and oil pan.
| caution |
Install the oil pan immediately after applying sealant.
|
3.Apply liquid gasket of Φ2.5 ±
0.5 mm of thickness in diameter to
the illustrated area of the oil pan.
Specified sealant:
Three bond 1217G or equivalent
4.Tighten the oil pan to the specified torque of 10 ±
2 N·m (M6) and
29 ±
2 N·m (M8).
|
|
|
1.Completely remove liquid gasket adhering to the cylinder head cover, timing chain
case and cylinder head.
|
|
|
2.Using white gasoline and so on, degrease the surface where the liquid gasket is applied
and the contact.
|

|
| caution |
Install the cylinder head cover immediately after liquid
gasket is applied.
|
3.Appropriately use a minimum amount of sealant. Besides, be careful not to allow sealant
to squeeze out from the application area.
Apply liquid gasket of 4 mm of thickness in diameter.
Specified sealant:
Three bond 1217G or equivalent
|

|
4.5.Tighten the cylinder head cover to the tightening torque of 3.0 ±
1.0 N·m
in the order shown in the illustration.
6.Then, tighten it to the specified torque of 5.5 ±
0.5 N·m in the
same order.
|
|
|
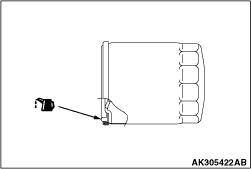
1.Clean the oil filter mounting surface of the ladder frame.
|
|
2.Apply engine oil to the O-ring of the oil filter.
|
|
| caution |
Use special tool filter wrench (MB991396) to install the
oil filter. Tightening it by hand causes oil leakage due to lack of torque.
|
3.Screw in the oil filter. When the O-ring contacts the mounting surface, use a filter
wrench to tighten it 3/4 turns (14 ±
2 N·m).
|

