|
|
1.Pull 3 pin connector off oil level / oil temperature sensor.
|
|
|
2.Remove connecting bolts for sump and gearbox.
|
|
|
3.Install sump bolts using commercial item.
|
|
|
4.Remove sump. Loosen sump with light blows of a rubber headed hammer if necessary.
|
|
|
5.Remove sealant residue on cylinder block with a flat scraper.
|

|
6.Remove sealant residue on oil pan with a rotating brush, e.g. a hand drill with a plastic
brush (wear protective glasses).
7.Clean sealing surfaces. They must be free of oil and grease.
|
|
|
2.Remove front case; if necessary, loosen by applying light blows with a rubber-headed hammer.
|
|
|
3.Remove sealant residue on cylinder block with a flat scraper.
|

|
4.Remove residual sealant from front case using a plastic rotary brush (wear eye protection).
5.Clean sealing surfaces. They must be free of oil and grease.
|
|
|
Install oil pump to cylinder block.
|
|
|
Install suction line to oil pump.
|
|
|
Install chain tensioner with tensioning rail to cylinder block.
|

|
1.Cut off tube nozzle at forward marking (approx. 3 mm diameter of nozzle).
| note |
- Sealant bead must not be wider than 2 to 3 mm, because otherwise excess sealant
can enter sump and clog strainer in oil pump suction pipe as well as drip onto crankshaft oil
seal.
- Before applying sealant bead, cover sealing surface of oil seal with a clean rag.
|
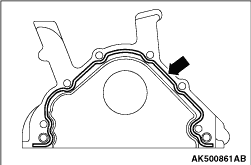
Specified sealant: Three bond 1207F or equivalent
|
|
2.Apply silicone sealant bead as shown to the clean sealing surface of front case.
3.Install front case immediately and tighten all bolts lightly.
| note |
When fitting oil seal case installed, use special tool Oil seal installer (MB995222).
|
4.Tighten securing bolts for front case to the specified torque of 15 N·m using
alternate and diagonal sequence.
|
|
|
1.Remove oil residue from end of crankshaft journal using clean cloth.
|

|
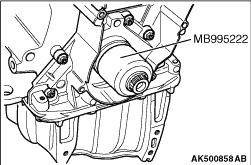
2.Place special tool Oil seal installer (MB995222) onto crankshaft journal.
3.Slide oil seal over guide sleeve onto crankshaft journal.
|
|
4.Press oil seal in to stop using special tool Oil seal installer (MB995222) and centre
bolt.
|
|
|
1.Clean both gasket surfaces of the oil pan and cylinder block.
|
|
|
2.Apply a 2.5 ± 0.5mm diameter bead of sealant to the oil pan.
Specified sealant: Three bond 1207F or equivalent
|

|
3.Apply sealant as indicated by the arrow in the illustration the grooves must be traced
and the bolt holes must be surrounded with a bead of sealant.
4.Install the oil pan to the bottom of the cylinder block.
| note |
- The sealing compound bead must not be thicker, otherwise excess sealing compound
will enter the oil pan and may block the oil suction line strainer.
|
|

