Code No. P0335: Crank Angle Sensor System
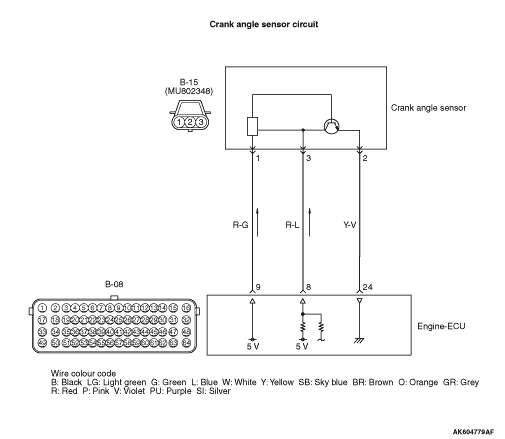


OPERATION
- Power is supplied to the crank angle sensor (terminal
No. 1) from the engine-ECU (terminal No. 9) and is earthed to the engine-ECU (terminal No. 24)
from the crank angle sensor (terminal No. 2).
- A power voltage of 5 V is applied to the crank angle sensor (terminal No. 3) from
the engine-ECU (terminal No. 8).
FUNCTION
- The crank angle sensor detects the crank angle and inputs
a pulse signal to the engine-ECU.
- In response to the signal, the engine-ECU controls the injector, etc.
TROUBLE JUDGMENT
Check Condition
- Engine is being cranked.
- There is no pulse signal input from the crank angle sensor, and a pulse signal of
the inlet camshaft position sensor is detected 10 times or more.
- Engine is running.
- A pulse signal from the crank angle sensor continues 264 times and engine speed
is less than 440 r/min.
- A crank angle sensor signal pattern is not normal.
- Malfunction is detected twice or more since the ignition switch is turned ON.
- Engine is running.
- A crank angle sensor signal pattern is not normal for 2 seconds and engine speed
is more than 440 r/min.
- None.
PROBABLE CAUSES
- Failed crank angle sensor
- Open/short circuit or harness damage in crank angle sensor circuit or loose connector
contact
- Failed engine-ECU
DIAGNOSIS PROCEDURE |
STEP 1. M.U.T.-III data list |
|
Q.
Is the check result normal?
|
 Intermittent malfunction (Refer to GROUP 00 - How to Use Troubleshooting/Inspection
Service Points - How to Cope with Intermittent Malfunctions  ). |
|
 Go to Step 2. |
|
STEP 2. Connector check: B-15 crank angle sensor connector |
Q.
Is the check result normal?
|
| Go to Step 3. |
|
| Repair or replace the connector. |
|
STEP 3. Perform voltage measurement at B-15 crank angle sensor connector. |
|
| OK: 4.9 - 5.1 V |
Q.
Is the check result normal?
|
| Go to Step 7. |
|
| Go to Step 4. |
|
STEP 4. Connector check: B-08 engine-ECU connector |
Q.
Is the check result normal?
|
| Go to Step 5. |
|
| Repair or replace the connector. |
|
STEP 5. Check harness between B-15 (terminal No. 3) crank angle sensor connector and B-08 (terminal No. 8) engine-ECU connector. |
|
Q.
Is the check result normal?
|
| Go to Step 6. |
|
| Repair the damaged harness wire. |
|
STEP 6. M.U.T.-III data list |
|
Q.
Is the check result normal?
|
| Intermittent malfunction (Refer to GROUP 00 - How to Use Troubleshooting/Inspection
Service Points - How to Cope with Intermittent Malfunctions ). |
|
| Replace the engine-ECU. |
|
STEP 7. Perform voltage measurement at B-15 crank angle sensor connector. |
|
| OK: 4.9 - 5.1 V |
Q.
Is the check result normal?
|
| Go to Step 10. |
|
| Go to Step 8. |
|
STEP 8. Connector check: B-08 engine-ECU connector |
Q.
Is the check result normal?
|
| Go to Step 9. |
|
| Repair or replace the connector. |
|
STEP 9. Check harness between B-15 (terminal No. 1) crank angle sensor connector and B-08 (terminal No. 9) engine-ECU connector. |
|
Q.
Is the check result normal?
|
| Go to Step 6. |
|
| Repair the damaged harness wire. |
|
STEP 10. Perform resistance measurement at B-15 crank angle sensor connector. |
|
| OK: Continuity (2 Ω or less) |
Q.
Is the check result normal?
|
| Go to Step 13. |
|
| Go to Step 11. |
|
STEP 11. Connector check: B-08 engine-ECU connector |
Q.
Is the check result normal?
|
| Go to Step 12. |
|
| Repair or replace the connector. |
|
STEP 12. Check harness between B-15 (terminal No. 2) crank angle sensor connector and B-08 (terminal No. 24) engine-ECU connector. |
|
Q.
Is the check result normal?
|
| Go to Step 6. |
|
| Repair the damaged harness wire. |
|
STEP 13. Perform output wave pattern measurement at B-15 crank angle sensor connector (Using an oscilloscope). |
|
| OK: Waveforms should be displayed on inspection procedure using an oscilloscope
(Refer to ), its maximum value should be 4.8 V or more, and
its minimum value should be 0.6 V or less. There must be no noise in the output wave pattern. |
Q.
Is the check result normal?
|
| Go to Step 6. |
|
| Go to Step 14. |
|
STEP 14. Connector check: B-08 engine-ECU connector |
Q.
Is the check result normal?
|
| Go to Step 15. |
|
| Repair or replace the connector. |
|
STEP 15. Check harness between B-15 (terminal No. 1) crank angle sensor connector and B-08 (terminal No. 9) engine-ECU connector. |
|
Q.
Is the check result normal?
|
| Go to Step 16. |
|
| Repair the damaged harness wire. |
|
STEP 16. Check harness between B-15 (terminal No. 3) crank angle sensor connector and B-08 (terminal No. 8) engine-ECU connector. |
|
Q.
Is the check result normal?
|
| Go to Step 17. |
|
| Repair the damaged harness wire. |
|
STEP 17. Replace the crank angle sensor |
|
Q.
Is the diagnosis code set?
|
| Replace the crank angle sensor sensing ring. |
|
| Check end. |
|