REMOVAL AND INSTALLATION


Pre-removal operation
  • Door trim assembly removal (Refer to GROUP 52A - Door Trim .)
  • Waterproof film removal (Refer to .)

Post-installation operation
  • Door inside handle play check (Refer to .)
  • Door outside handle play check (Refer to .)
  • Waterproof film installation (Refer to .)
  • Door trim assembly installation (Refer to GROUP 52A - Door Trim .)


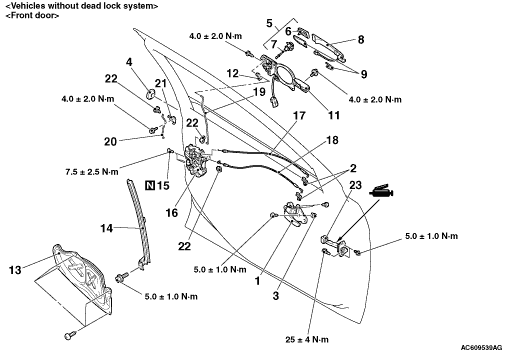
Door inside handle removal 

>>B<<
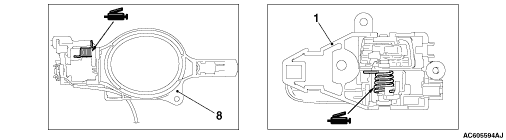
1.
Door inside handle


2.
Clip


3.
Grommet


Door lock key cylinder and door outside handle removal steps 


4.
Plug
<<A>>
>>C<<
5.
Door outside handle cover assembly <Vehicles without keyless entry system (both sides), vehicles with keyless entry system (driver’s side)>


6.
Door lock key cylinder <Vehicles without keyless entry system (both sides), vehicles with keyless entry system (driver’s side)>


7.
Door outside handle cover


8.
Door outside handle


9.
Door outside handle gasket


10.
Door lock cover <Driver’s side (RHD)>


11.
Door outside handle base


12.
Clip


Door latch removal steps 

>>B<<
1.
Door inside handle


13.
Door speaker bracket <Vehicles with audio amplifier>


14.
Rear lower sash


15.
Screw


16.
Door latch assembly


17.
Inside lock cable


18.
Inside handle cable


19.
Outside handle rod


20.
Front door outside lock rod


21.
Front door panel bracket


22.
Front door locking clip


Door check removal steps 


·
Front door speaker (Refer to GROUP 54A - Speaker .)

>>A<<
23.
Door check


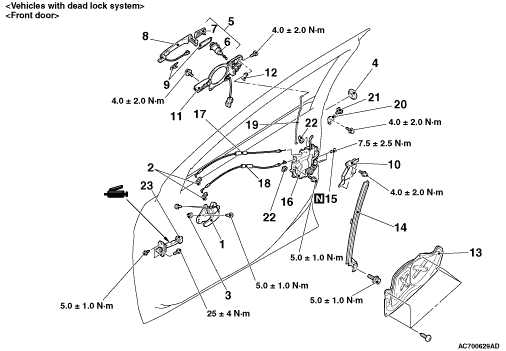
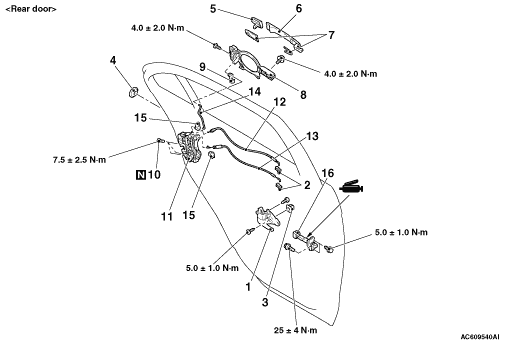
Door inside handle removal 

>>B<<
1.
Door inside handle


2.
Clip


3.
Grommet


Door outside handle removal steps 


4.
Plug
<<A>>
>>C<<
5.
Door outside handle cover


6.
Door outside handle


7.
Door outside handle gasket


8.
Door outside handle base


9.
Clip


Door latch removal steps 

>>B<<
1.
Door inside handle


10.
Screw


11.
Door latch assembly


12.
Inside lock cable


13.
Inside handle cable


14.
Outside handle rod


15.
Clip


Door check removal steps 


·
Rear door speaker (Refer to GROUP 54A, Speaker .)

>>A<<
16.
Door check

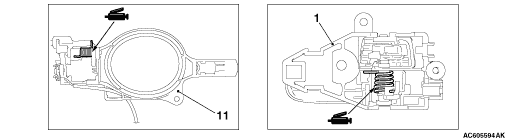
REMOVAL SERVICE POINT


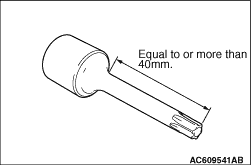
<<A>> DOOR OUTSIDE HANDLE COVER REMOVAL


Prepare a tool as shown to remove the door outside handle cover.

INSTALLATION SERVICE POINTS


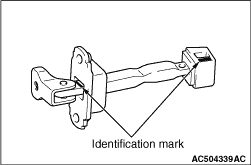
>>A<< DOOR CHECK INSTALLATION


Install the door check with the following identification marks facing upward.
Application
Identification mark
Front door
Left door
55L
Right door
55R
Rear door
Left door
64L
Right door
64R

>>B<< DOOR INSIDE HANDLE INSTALLATION


When connecting the inside cable to the door inside handle, ensure that the door latch and the inside handle are locked.

>>C<< DOOR OUTSIDE HANDLE COVER INSTALLATION


Prepare a tool as shown, and tighten it to the specified torque.
Tightening torque: 4.0 ± 2.0 N·m