|
|
1.Remove the second seat assembly (Refer to GROUP 52A - Second Seat Assembly  ), and turn up the floor carpet. ), and turn up the floor carpet.
|

|
2.Remove the floor inspection lid (LH).
|
|
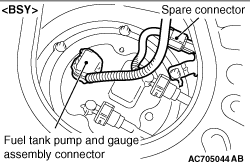
3.Disconnect the fuel tank pump and gauge assembly connector and spare connector. <BSY>
|
|
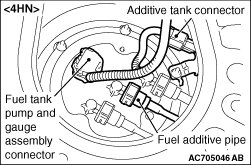
4.Disconnect the fuel tank pump and gauge assembly connector, additive tank connector and the fuel additive pipe. <4HN>
|

|
5.Insert a flat-tip screwdriver (6 mm wide and 1 mm thick) into the retainer of the fuel main pipe connector and fuel return pipe connector.
|

|
6.
| caution |
When pushing up the retainer of the fuel main pipe connector and fuel return pipe connector, pay attention to avoid damage to the retainer.
|
Turn the flat-tip screwdriver inserted into the retainer by 90 degrees to push up the retainer and unlock the fuel main pipe connector and fuel return pipe connector.
7.Disconnect the fuel main pipe and fuel return pipe from the fuel tank pump and gauge assembly.
|
|
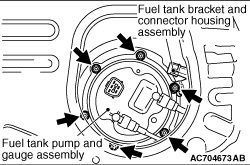
8.Remove the mounting nuts of fuel tank pump and gauge assembly.
9.Remove the fuel tank bracket and connector housing assembly and the fuel pump bracket plate. <BSY>
10.Remove the fuel tank bracket and additive tank connector assembly and the fuel pump bracket plate. <4HN>
|

|
11.
| caution |
Pay attention not to damage the gauge unit and the float of fuel tank pump and gauge assembly when withdrawing it from the service hole.
|
While withdrawing the fuel tank pump and gauge assembly from the service hole, disconnect the suction hose from the fuel tank pump and gauge assembly to remove the fuel tank pump and gauge assembly from the fuel tank.
12.Replace the fuel tank pump and gauge assembly gasket with a new one.
|
|
13.
| caution |
- Pay attention not to damage the gauge unit and the float of fuel tank pump and gauge assembly when installing it to the fuel tank from the service hole.
- Pay attention to prevent the float of fuel tank pump and gauge assembly from being trapped by the suction hose inside the fuel tank.
- When installing the fuel tank pump and gauge assembly to the fuel tank, check that the gauge moving area moves smoothly.
|
While inserting the fuel tank pump and gauge assembly into the fuel tank from the service hole, connect the suction hose to the fuel tank pump and gauge assembly to install the fuel tank pump and gauge assembly to the fuel tank.
14.Install the fuel pump bracket plate and the fuel tank bracket and connector housing assembly. <BSY>
15.Install the fuel tank bracket and connector housing assembly and the fuel pump bracket plate. <4HN>
|
|
16.Tighten the fuel tank pump and gauge assembly mounting nuts to the specified torque.
Tightening torque: 2.5 ± 0.4 N·m
|

|
17.Pull up the retainer of fuel main pipe and fuel return pipe to unlock before installing.
|

|
18.
| caution |
- When pushing in the retainer of the fuel main pipe connector and fuel return pipe connector, pay attention to avoid damage to the retainer.
- After the installation of the fuel main pipe connector and fuel return pipe connector, slightly pull the fuel main pipe and fuel return pipe to check that it is connected securely. At this time, also check that there is approximately 1 mm play.
|
Install the fuel main pipe and fuel return pipe to the fuel tank pump and gauge assembly securely and push in the retainer of the fuel main pipe connector and fuel return pipe connector to lock the fuel main pipe and fuel return pipe and fuel tank pump and gauge assembly.
|
|
19.Connect the fuel tank pump and gauge assembly connector and spare connector. <BSY>
|
|
20.Connect the fuel tank pump and gauge assembly connector, the additive tank connector and the fuel additive pipe. <4HN>
|
|
21.Install the floor inspection lid (LH).
22.Return the floor carpet to the original condition and install the second seat assembly (Refer to GROUP 52A - Second Seat Assembly ).
|