REMOVAL AND INSTALLATION


warning
  • Never repair or disassemble the front impact sensor. If faulty, replace it.
  • Do not drop or subject the front impact sensor to impact or vibration. If denting, cracking, deformation, or rust is discovered in the front impact sensor, replace it with a new front impact sensor. Discard the old one.
  • After deployment of an air bag, replace the front impact sensor with a new one.

Pre-removal Operation
  • Turn the ignition switch to the "LOCK" (OFF) position.


Removal step


·
Disconnect the negative battery terminal.
<<A>>

1.
Front impact sensor <RH>
<<B>>

2.
Front impact sensor <LH>


Installation steps


·
Disconnect the negative battery terminal.

>>A<<
·
Pre-installation inspection

>>B<<
2.
Front impact sensor <LH>

>>B<<
1.
Front impact sensor <RH>


·
Connect the negative battery terminal.

>>C<<
·
Post-installation inspection
note The figure indicates the right front impact sensor. The left impact sensor is symmetrical to this.

REMOVAL SERVICE POINTS


<<A>> FRONT IMPACT SENSOR (RH) REMOVAL


Disconnect the battery (Refer to GROUP 54A, Battery ).

<<B>> FRONT IMPACT SENSOR (LH) REMOVAL


1.Disconnect the radiator condenser tank (Refer to GROUP 14, Radiator ).
2.Disconnect the oil reservoir (Refer to GROUP 37, Power steering hose ).

INSTALLATION SERVICE POINTS


>>A<< PRE-INSTALLATION INSPECTION


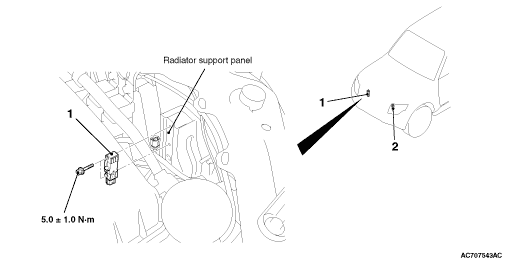
Before the installation, check the front impact sensor (Refer to ).
note Even when installing a new front impact sensor, perform an inspection before the installation.

>>B<< FRONT IMPACT SENSOR INSTALLATION


warning The SRS may not activate properly if a front impact sensor is not installed properly, which could result in serious injury or death to the vehicle’s driver.
1.Securely connect the connector.
2.Position the front impact sensor facing toward the front of the vehicle as indicated by the arrow on the label, and install it securely.

>>C<< POST-INSTALLATION INSPECTION


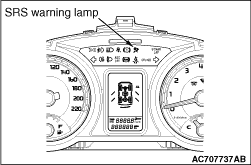
1.Turn the ignition switch to "ON" position.

2.Does the SRS warning lamp illuminate for about 7 seconds, and go out?
3.If no, refer to troubleshooting (Refer to ).