
|
1.With the navigation system active, press and hold both the "NAVI" and "SET" buttons for 3.5 seconds.
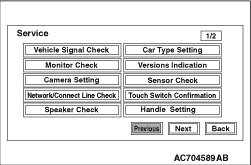
2.The service mode will be initiated. Then "Service" screen will be displayed.
|
|
|
If the operations below are done, the service mode will be terminated.
|
|
|
- If "Back" button is selected on "Service" screen, the service mode will terminate and then return to the previous screen.
- If "NAVI" button is pressed with the service mode active, the service mode will terminate and change to the navigation screen.
| note |
If "NAVI" button is pressed, the following functions of the service mode will terminate.
- Vehicle Signal Check
- Monitor Check
- Camera Setting
- Network/Connect Line Check
- Speaker Check
- Car Type Setting
- Versions Indication
- Sensor Check
- Touch Switch Confirmation
- Handle Setting
- Memory Initialization
- TMC Sensitivity
- Versions Log Information
|
|
|
1.Select "Vehicle Signal Check" on "Service" screen.
|

|
2.The check results will be displayed for the items below.
- "Speed": "ON" when the vehicle speed is 6 km/h or more, and "OFF" when the vehicle speed is 4 km/h or less.
- "ILL": "ON" when the headlamps are on, and "OFF" when they are off.
- "Shift Position R": "ON" when the selector lever is at R position, and "OFF" when it is at the other position.
|
|
1.Select "Monitor Check" on "Service" screen.
|

|
2.Eight colour bars will be displayed.
|

|
3.When "Enter" is pressed on the navigation unit joystick while the eight colour bars are shown, grey scale will be displayed with a 16-step gradation.
|
|
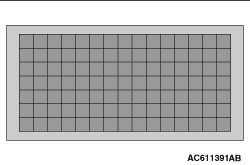
4.When "Enter" is pressed while the grey scale is shown with a 16-step gradation, a crosshatch pattern will be displayed (Each cell should be square).
|

|
5.When "Enter" is pressed on the navigation unit joystick while the crosshatch pattern is shown, the screen will turn white.
|

|
6.When "Enter" is pressed on the navigation unit joystick while the screen is white, it will turn black.
|

|
7.When "Enter" is pressed on the navigation unit joystick while the screen is black, the screen will turn red.
|

|
8.When "Enter" is pressed on the navigation unit joystick while the screen is red, it will turn green.
|

|
9.When "Enter" is pressed on the navigation unit joystick while the screen is green, it will turn blue.
10.When "Enter" is pressed on the navigation unit joystick while the screen is green, it will return to the "Service" screen.
|
|
1.Select "Camera Stetting" on "Service" screen.
|


|
2.Draw lines 0.5 m behind the vehicle and width +0.4 m (+0.2 m each for right and left) and align the guideline over the line.
|
|
1.Select "Network/Connect Line Check" on "Service" screen.
|

|
2.A network and connect line check will be initiated. The "Network/Connect Line Check" screen will display how the check is in progress.
|


|
3.When the network and connect line check is finished, the screen will change to "Network/Connect Line Result" to show the check results.
| note |
If there is "NG" or "N/A" as the check results, select "NG Code" on the "Network/Connect Line Result" screen. Then "NG code Indication" screen will show the NG code.
|
4.If "Back" is selected on "Network/Connect Line Result", the screen will return to "Service" screen.
|
|
1.Select "Speaker Check" on "Service" screen.
|

|
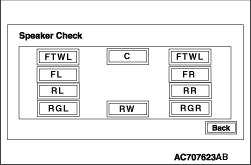
2.Select a speaker to be checked, and play test tone through the speaker.
| note |
- The options "C" (Front speaker), "FTWL" (Front tweeter-LH), "FTWR" (Front tweeter-RH), "RGL" (Back door speaker-LH), "RGR" (Back door-RH), and "RW" (Sub woofer) are displayed for vehicles with 12 speakers only.
- For other vehicles, when [FL] is selected, the front door speaker-LH and the tweeter-LH output the test sound, and when [FR] is selected, the front door speaker-RH and the tweeter-RH output the test sound.
- Volume can be adjusted while test tone is being played.
- During the test, only the selected speaker sounds. If "Back" is selected during the test, the test tone will disappear.
|
|
|
1.Select "Car Type Setting" on "Service" screen.
|

|
2.The vehicle name is displayed.
| note |
It cannot be changed to another vehicle model.
- "3M00X (SHORT)": MITSUBISHI PAJERO <Short wheelbase>
- "3M00X (LONG)": MITSUBISHI PAJERO <Long wheelbase>
|
|
|
|
Displays versions indication (Loader, Application, Audio Microcomputer, Navi Sub Microcomputer, Map Data, Monitor, and CAN BOX).
|

|
1.Select "Versions Indication" on "Service" screen.
|

|
2.Versions indication is displayed.
|
|
|
The speed sensor and gyro sensor will be checked, depending on the vehicle conditions such as driving condition, stationary condition and travel direction change.
|
|
1.Select "Sensor Check" on "Service" screen.
|


|
2.The sensor check with the vehicle stationary will be executed in accordance with the screen.
|

|
3.The sensor check with the vehicle in motion will be executed in accordance with the screen.
|


|
4.When the sensor checks are complete, the screen will display the check results.
| note |
If there is "NG" or "N/A" as the check results, select "NG Code" on the "Sensor Check" screen. Then "NG code Indication" screen will show the NG code.
|
|
NG CODE REFERENCE TABLE FOR SENSOR CHECK
Sensor classification
|
NG Code No.
|
Error items
|
Gyro sensor
|
1
|
Offset error while the vehicle is stationary (lower limit error)
|
2
|
Offset error while the vehicle is stationary (upper limit error)
|
5
|
Output error during driving
|
Speed sensor
|
6
|
Output error while the vehicle is stationary
|
|
|
|
|
1.Select "Touch Switch Confirmation" on "Service" screen.
|


|
2.If you touch the screen, the colour of the dotted coordinate at the touched area will be changed.
|
|
1.Select "Handle Setting" on "Service" screen.
|
|
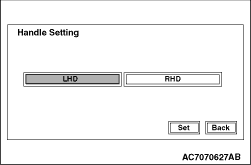
2.Select the currently-set handle to display.
3.To change the handle setting, select the handle to be changed to, and then select "Set."
| note |
Even when the handle is selected, the selected handle will not be set if "Back" is selected.
|
|
|
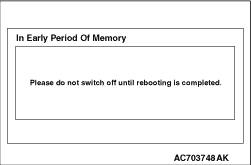
1.Select "Memory Initialization" on "Service" screen.
|

|
2.If you select "Start" on "Memory Initialization" screen, the settings such as registered locations and music server will be erased (initialised) from the memory.
| note |
If the ignition switch is turned to "LOCK" (OFF) position during the initialisation, the initialisation will be suspended. If the ignition switch is turned to "ACC" or "ON" position, the initialisation will be resumed.
|
3.After the memory initialisation is complete, the navigation system will restart automatically.
|
|
1.Select "TMC sensitivity" on "Service" screen.
|

|
2.The information of TMC station is displayed.
| note |
When the now-received information is from selected TMC station, "TMC_station" is displayed on the upper right of the screen. "-" is displayed when the information is not received.
|
|

|
3.Select "TMC Search" on the "TMC information" screen to search the TMC station that can be received, and update and display the contents of "Found station list".
4.Select "TMC station" displayed on the "Found station list" and press "decision" switch to update the received TMC station and return to the "TMC information" screen. The information of selected TMC station is displayed on the TMC information screen.
|

|
5.Select "TMC Manual Search" on the "TMC information" screen to set the frequency by "<" or ">" switch.
6.Update the received TMC station by "Set" switch and return to the "TMC information" screen. The information of selected TMC station is displayed on the TMC information screen.
|
|
|
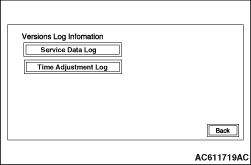
Displays logs for drive and HDD.
|

|
Service Data Log
- Select "Versions Log Information" on "Service" screen.
- Select "Service Data Log" on the "Versions Log Information" screen.
- The logs are displayed from the latest one.
- The log data is erased by pressing "Delete."
|
|
EACH LOG INFORMATION: FACTOR CODE TABLE
Item
|
Factor number
|
Produced log
|
Drive
|
20
|
Log concerning focus
|
21
|
Log concerning disc type
|
22
|
Log concerning disc
|
25
|
Log concerning SEEK
|
26
|
Log concerning servo start-up
|
27
|
Log concerning power-On
|
28
|
Log concerning loading / eject operation
|
29
|
Log concerning pick-up operation
|
30
|
Log concerning state of mechanism
|
52
|
Log concerning TOC reading
|
HDD
|
1
|
Log concerning high temperature
|
2
|
Log concerning low temperature
|
Monitor
|
1
|
Log concerning high temperature
|
AMP
|
0
|
Log concerning connection
|
15
|
Log concerning communication
|
|
|
|
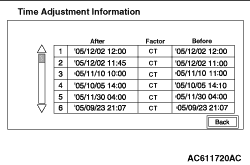
Time Adjustment Log
- Select "Time Adjustment Log" on the "Versions Log Information" screen.
- The time adjustment logs are displayed.
As for Factor, the following two types are displayed.
CT: Automatic adjustment
MAN: Manual adjustment
|