|
|
Using M.U.T.-III, check the data list (Refer to  - data
list reference table.)
|
|
|
- Item 74: Stop lamp switch.
|
|
|
Q.
Is the check result normal?
|
|
|
Check the stop lamp operation.
|
|
|
OK:
Brake pedal depressed: Stop lamp will illuminate.
Brake pedal not depressed: Stop lamp does not illuminate.
|
|
|
Q.
Is the check result normal?
|
|
|
Q.
Is the check result normal?
|
|
|
 Repair or replace the damaged connector. Then go to Step 20.
|
|
|
|
|
|
- Check harness wire for open/short circuit and damage.
|
|
|
Q.
Is the check result normal?
|
|
|
Repair or replace the damaged harness wire. Then go to Step 20.
|
|
|
|
|
|
Using M.U.T.-III, check the data list (Refer to - data
list reference table.)
|
|
|
- Item 74: Stop lamp switch.
|
|
|
Q.
Is the check result normal?
|
|
|
Replace the engine-A/T-ECU (Refer to GROUP 13A - Engine-A/T-ECU ) <6G75>,
or replace the engine-ECU <M/T> or engine-A/T-ECU <A/T> (Refer to
GROUP 13D - Engine-ECU and Engine-A/T-ECU ) <6G72>.
Then go to Step 20.
|
|
|
|
|
|
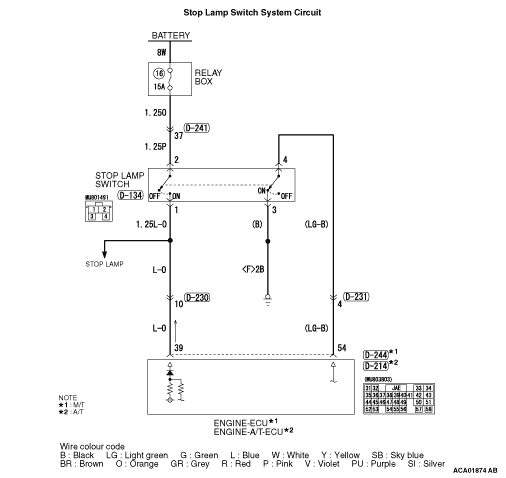
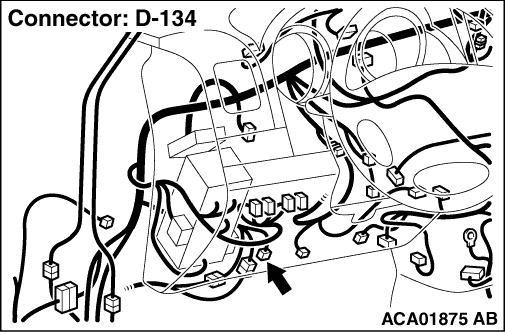
(1)Disconnect stop lamp switch connector D-134 and measure at the harness connector
side.
|
|
|
(2)Measure the terminal voltage between stop lamp switch connector D-134 terminal
No.2 and earth.
OK: System voltage
|
|
|
Q.
Is the check result normal?
|
|
|
Q.
Is the check result normal?
|
|
|
Repair or replace the damaged connector. Then go to Step 20.
|
|
|
|
|
|
- Check harness wire for open/short circuit and damage.
|
|
|
Q.
Is the check result normal?
|
|
|
Repair or replace the damaged harness wire. Then go to Step 20.
|
|
|
|
|
|
Q.
Is the check result normal?
|
|
|
Check the stop lamp system harness and replace the fuse. Then go to Step 20.
|
|
|
|
|
|
Q.
Is the check result normal?
|
|
|
Repair or replace the damaged connector. Then go to Step 20.
|
|
|
|
|
|
- Check harness wire for open/short circuit and damage.
|
|
|
Q.
Is the check result normal?
|
|
|
Repair or replace the damaged harness wire. Then go to Step 20.
|
|
|
|
|
|
Refer to GROUP 35A - Brake Pedal, Inspection, Stop Lamp Switch Check .
|
|
|
Q.
Is the check result normal?
|
|
|
Replace the stop lamp switch (Refer to GROUP 35A - Brake Pedal ).
Then go to Step 20.
|
|
|
|
|
|
Using M.U.T.-III, check the data list (Refer to - data
list reference table.)
|
|
|
- Item 74: Stop lamp switch.
|
|
|
Q.
Is the check result normal?
|
|
|
Replace the engine-A/T-ECU (Refer to GROUP 13A - Engine-A/T-ECU ) <6G75>,
or replace the engine-ECU <M/T> or engine-A/T-ECU <A/T> (Refer to
GROUP 13D - Engine-ECU and Engine-A/T-ECU ) <6G72>.
Then go to Step 20.
|
|
|
|
|
|
Using M.U.T.-III, check the data list (Refer to - data
list reference table.)
|
|
|
Q.
Is the check result normal?
|
|
|
Q.
Is the check result normal?
|
|
|
Repair or replace the damaged connector. Then go to Step 20.
|
|
|
|
|
|
- Check harness wire for open/short circuit and damage.
|
|
|
Q.
Is the check result normal?
|
|
|
Repair or replace the damaged harness wire. Then go to Step 20.
|
|
|
|
|
|
Refer to GROUP 35A - Brake Pedal, Inspection, Stop Lamp Switch Check .
|
|
|
Q.
Is the check result normal?
|
|
|
Replace the stop lamp switch (Refer to GROUP 35A - Brake Pedal ).
Then go to Step 20.
|
|
|
|
|
|
Using M.U.T.-III, check the data list (Refer to - data
list reference table.)
|
|
|
Q.
Is the check result normal?
|
|
|
Replace the engine-A/T-ECU (Refer to GROUP 13A - Engine-A/T-ECU ) <6G75>,
or replace the engine-ECU <M/T> or engine-A/T-ECU <A/T> (Refer to
GROUP 13D - Engine-ECU and Engine-A/T-ECU ) <6G72>.
Then go to Step 20.
|
|
|
|
|
|
(1)Disconnect the negative battery terminal, and erase the diagnosis code of the cruise
control system.
|
|
|
(2)Connect the negative battery terminal.
|
|
|
(3)Turn the ignition switch to the "ON" position, and push the "ON/OFF" switch
to turn the cruise control system to ON (turn ON the cruise control indicator lamp).
|
|
|
(4)With the cruise control switches not operated, depress the brake pedal for several
seconds, and then read the diagnosis code of the cruise control system (Refer to ).
|
|
|
Q.
Is diagnosis code No. 22 set?
|
|
|
 Replace the engine-A/T-ECU (Refer to GROUP 13A - Engine-A/T-ECU ) <6G75>,
or replace the engine-ECU <M/T> or engine-A/T-ECU <A/T> (Refer to
GROUP 13D - Engine-ECU and Engine-A/T-ECU ) <6G72>.
Then go to Step 20.
|
|
|
|
|
|
It can be assumed that this malfunction is intermittent (Refer to GROUP 00 - How
to Use Troubleshooting/Inspection Service Points, How to Cope with Intermittent Malfunctions .)
|
|
|
|
|
|
Using M.U.T.-III, check the data list (Refer to - data
list reference table)
|
|
|
- Item 74: Stop lamp switch.
- Item 89: Brake switch.
|
|
|
Q.
Is the check result normal?
|
|
|
(1)Disconnect the negative battery terminal, and erase the diagnosis code of the cruise
control system.
|
|
|
(2)Connect the negative battery terminal.
|
|
|
(3)Turn the ignition switch to the "ON" position, and push the "ON/OFF" switch
to turn the cruise control system to ON (turn ON the cruise control indicator lamp).
|
|
|
(4)With the cruise control switches not operated, depress the brake pedal for several
seconds, and then read the diagnosis code of the cruise control system (Refer to ).
|
|
|
Q.
Is diagnosis code No. 22 set?
|
|
|
The procedure is complete.
|
|
|
|