REMOVAL AND INSTALLATION


Cowl side trim removal steps


1.
Front scuff plate


2.
Cowl side trim


Rear scuff plate removal step


·
Rear seat cushion (Refer to ).


3.
Rear scuff plate


Front pillar trim removal steps


4.
Front door opening trim


6.
Front pillar trim
<<A>>

7.
Front pillar trim clip


Centre pillar trim removal steps


1.
Front scuff plate


·
Rear seat cushion (Refer to ).


3.
Rear scuff plate


4.
Front door opening trim


5.
Rear door opening trim


8.
Centre pillar cover inner


9.
Centre pillar trim lower
<<B>>

10.
Centre pillar trim cap


11.
Centre pillar trim upper


Rear shelf trim removal step


12.
Rear shelf trim


Cargo floor box removal steps


13.
Cargo floor lid


14.
Cargo floor pad <Vehicles with cargo floor pad>


15.
Cargo floor box (centre) <Vehicles with cargo floor box (centre)>


16.
Cargo floor board front


17.
Cargo floor box


18.
Cargo floor box (LH/RH)


Rear end trim removal steps


13.
Cargo floor lid


15.
Cargo floor box (centre) <Vehicles with cargo floor box (centre)>


16.
Cargo floor board front


17.
Cargo floor box


19.
Rear end trim


Quarter trim removal steps


·
Rear seat cushion (Refer to ).


·
Rear seat back assembly (Refer to ).


3.
Rear scuff plate


5.
Rear door opening trim


12.
Rear shelf trim


13.
Cargo floor lid


14.
Cargo floor pad <Vehicles with cargo floor pad>


15.
Cargo floor box (centre) <Vehicles with cargo floor box (centre)>


16.
Cargo floor board front


17.
Cargo floor box


18.
Cargo floor box (LH/RH)


19.
Rear end trim


20.
Parcel strap hook


21.
Quarter trim lid


22.
Luggage room lamp


23.
Quarter trim lower
<<B>>

24.
Quarter upper trim cap


25.
Quarter trim upper
note For the vehicles with curtain air bag, install the front pillar trim provided for curtain air bag.

CLIP AND CLAW POSITIONS


note Each number in the illustration indicates a part number.

REMOVAL SERVICE POINTS


<<A>>FRONT PILLAR TRIM REMOVAL


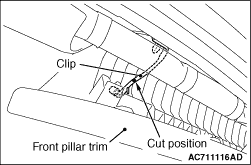
1.Pull down the front or rear pillar trim as shown in the figure.
2.Cut the clip at the cutting position shown in the figure, taking care not to damage the other components.
3.Remove the clip remaining on the front or rear pillar trim, taking care not to scratch the trim.
4.Remove the clip remaining on the vehicle side by breaking it to prevent damage to the flange of the clip mounting hole.

<<B>> CENTRE PILLAR TRIM CAP/QUARTER TRIM UPPER CAP REMOVAL


Remove the opening trim. Remove the trim cap by inserting the special tool ornament remover (MB990784) between the trim and body as shown in the illustration.