REMOVAL AND INSTALLATION


Pre-removal operation
  • Coolant Draining (Refer to .)
  • Front side member cover A and front wheel house cover removal (Refer to GROUP 51 - Under Cover .)
  • Front bumper core removal (Refer to GROUP 51 - Front Bumper Assembly .)
  • Headlamp assembly removal (Refer to GROUP 54A - Headlamp .)
  • Horn removal (Refer to GROUP 54A - Horn .)
  • Hood latch removal (Refer to GROUP 42 - Hood .)
  • Heater Piping Hose B Clip Connection Removal (Refer to GROUP 55 - Heater Hose ) <Vehicles for cold districts>

Post-installation operation
  • Heater Piping Hose B Clip Connection Installation (Refer to GROUP 55 - Heater Hose ) <Vehicles for cold districts>
  • Hood latch installation (Refer to GROUP 42 - Hood .)
  • Horn installation (Refer to GROUP 54A - Horn .)
  • Headlamp assembly installation (Refer to GROUP 54A - Headlamp .)
  • Front bumper core installation (Refer to GROUP 51 - Front Bumper Assembly .)
  • Front side member cover A and front wheel house cover installation (Refer to GROUP 51 - Under Cover .)
  • Coolant refilling (Refer to .)


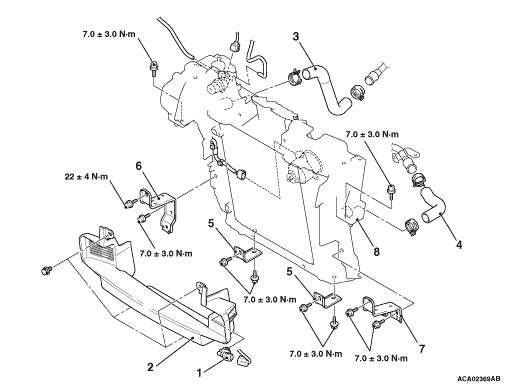
Removal steps


1.
Ambient temperature sensor


2.
Air guide panel
<<A>>
>>A<<
3.
Radiator lower hose
<<A>>
>>A<<
4.
Radiator upper hose


5
Radiator bracket


6.
Radiator bracket RH


7.
Radiator bracket LH
<<B>>

·
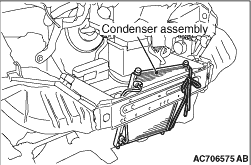
Condenser assembly (Refer to GROUP 55 - Condenser Assembly .)


8.
Cooling module

REMOVAL SERVICE POINTS


<<A>> RADIATOR HOSE DISCONNECTION


Because the hose and hose clip will be assembled back to original positions, make the mating mark as shown in the figure, and then perform the removal.

<<B>> CONDENSER ASSEMBLY REMOVAL


1.With the hoses and pipes still connected, remove the condenser assembly from the cooling module.
2.Tie the removed condenser assembly with a string at a position where it will not interfere with the removal and installation of cooling module.

INSTALLATION SERVICE POINTS


>>A<< RADIATOR HOSE CONNECTION


1.Insert the hose until the protrusion of each pipe.
2.Do not twist the hose. Align the mating marks of hose and hose clip, and then assemble.