REMOVAL AND INSTALLATION


caution
  • Disconnect the negative auxiliary battery terminal and wait for 60 seconds or more before starting work. Insulate the disconnected (-) terminal by wrapping the tape (Refer to the item 5 of Service Precautions ).
  • Never attempt to disassemble or repair the side impact sensor. If damaged, replace it with new one(s).
  • Handle the side impact sensor with sufficient caution, and do not drop or subject the sensor to impact or vibration. If there is a dent, crack, or deformation, replace with a new sensor.
  • After the side/curtain air bag deployment, replace with a new sensor.
  • After the judgment of high voltage shutdown, replace the side impact sensor with a new one.

Pre-removal operation
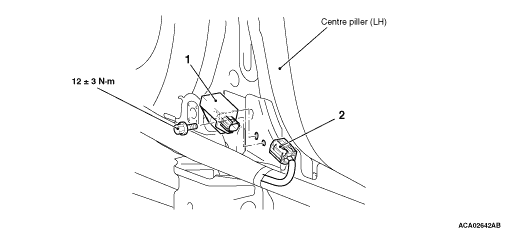
  • Electric motor switch to the LOCK (OFF) position.
  • Disconnect the negative auxiliary battery terminal.


Removal steps


·
Lower centre pillar trim (Refer to GROUP 52A - Interior Trim ).


1.
Side impact sensor
<<A>>

2.
Side impact sensor connector connection


Installation steps

>>A<<
·
Pre-installation inspection


2.
Side impact sensor connector connection

>>B<<
1.
Side impact sensor


·
Lower centre pillar trim (Refer to GROUP 52A - Interior Trim ).

>>C<<
·
Post-installation inspection
note The figure shows the left side impact sensor.

REMOVAL SERVICE POINT


<<A>> SIDE IMPACT SENSOR CONNECTOR REMOVAL


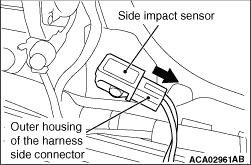
Slide the outer housing of the harness side connector in the arrow direction shown, and disconnect the connector.

INSTALLATION SERVICE POINTS


>>A<< PRE-INSTALLATION INSPECTION


Even when installing a new side impact sensor, perform an inspection before the installation (Refer to the item on inspection).

>>B<< SIDE IMPACT SENSOR INSTALLATION


caution
  • If the side impact sensor is not securely and correctly installed, the correct operation of side/curtain air bag is prevented.
  • If the side impact sensor is not securely and correctly installed, the correct control of high-voltage shutdown judgment is prevented.
Connect the connector securely.

>>C<< POST-INSTALLATION INSPECTION


1.Electric motor switch to the "ON" position.

2.Check that the SRS warning lamp is illuminated for 6 to 8 seconds, and extinguished afterward.
3.If the lamp does not extinguish, perform the troubleshooting (Refer to ).