REMOVAL AND INSTALLATION


Removal steps


1.
Sunvisor holder


2.
Sunvisor


3.
Front room lamp assembly <Except Single cab>


4.
Assist grip


5.
Assist grip clip


6.
Rear room lamp


7.
Clock hole cover <Except GLS-Limited>


8.
Clock assembly <Except GLS-Limited>


9.
Clock Garnish <Except GLS-Limited>


10.
Digital clock <Except GLS-Limited>


·
Microphone unit <Vehicles with microphone unit> (Refer to GROUP 54A -Microphone unit removal and installation .)


·
Front seat passenger’s side assembly <Double cab> (Refer to )
<<A>>

11.
Headlining


12.
Clock cover bracket <Except GLS-Limited>

REMOVAL SERVICE POINT


<<A>> HEADLINING REMOVAL


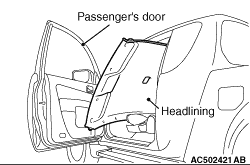
To remove the headlining from the vehicle, slide the front seat forward all the way, recline the seat-back to the back completely, and remove the headlining from passenger seat as shown in the figure. <Single cab and Club cab>


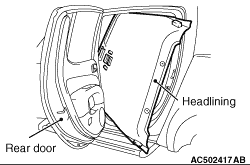
To remove the headlining from the vehicle, remove from the rear door (LH) as shown in the figure. <Double cab>