|
|
2.Remove the engine room under cover front B assembly. (Refer to GROUP 51 - Under cover  .) .)
|
|
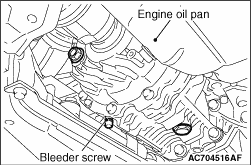
3.Remove the bleeder screw cap of the transfer, then connect the vinyl hose.
4.
| caution |
Before connecting or disconnecting M.U.T.-III, always turn the ignition switch to the LOCK (OFF) position.
|
Connect M.U.T.-III to the diagnosis connector. (Refer to GROUP 00 - Diagnosis Function ).
5.Position the steering wheel in a straight ahead direction.
6.Turn the ignition switch to the "ON" position.
7.Perform the actuator test (item No.1) of M.U.T.-III to forcibly activate the hydraulic unit.
| note |
- The forced activation (item No.1: Air bleeding mode) is continued for 5 minutes, then it will be cancelled automatically. Also, using the clear key on the M.U.T.-III, the activation can be forcibly cancelled.
- When the hydraulic unit functions are stopped due to the fail-safe, the forced activation cannot be performed.
|
8.From the straight-ahead position, gradually rotate the steering wheel to the right or left. Loosen the bleeder screw, and check that the air is bled with fluid.
9.
| caution |
- During the air bleeding, fill the fluid so that the fluid constantly remains in the oil reservoir.
- When the oil is filled into the empty oil reservoir, check that the oil is filled up under the filter inside the oil reservoir.
|
After bleeding the air, tighten the bleeder screw.
10.Repeat Steps 7 and 8 for two to three times. After checking that air mixing is eliminated, tighten the bleeder screw to the specified torque.
Tightening torque: 5.0 ± 1.0 N·m
11.
| caution |
If the air bleeding is insufficient, the noise from the hydraulic unit occurs, which may deteriorate the pump durability.
|
After the air bleeding is complete, check the fluid level.(Refer to ).
12.Install the engine room under cover front B assembly. (Refer to GROUP 51 - Under cover .)
|