|
|
Q.
Check the sources from which the sound is not output.
|
|
|
No sound only from radio : Perform Inspection Procedure 6 "The FM/MW/LM radio broadcasting can not be received." (Refer to  .)
|
|
|
|
|
|
No sound only when the CD is played : Perform Inspection Procedure 8 "CD/DVD cannot be played." (Refer to .)
|
|
|
|
|
|
No sound only when the DVD is played : Perform Inspection Procedure 8 "CD/DVD cannot be Played." (Refer to .) Or, perform Inspection Procedure 9 "Image of a DVD is Played, but no Sound is Played." (Refer to .)
|
|
|
|
|
|
No sound only when the music server is used : Go to Step 2.
|
|
|
|
|
|
No sound from any of the sources : Go to Step 2.
|
|
|
|
|
|
(1)Display the service data log for the MMCS service mode. (Refer to .)
|
|
|
(2)Check if the service data log for drive and HDD is displayed.
|
|
|
Q.
Is the service data log displayed?
|
|
|
YES (The service data log for drive is displayed.) : Perform Inspection Procedure 8 "CD/DVD cannot be Played." (Refer to .) Or, perform Inspection Procedure 9 "Image of a DVD is Played, but no Sound is Played." (Refer to .) Then, go to Step 3.
|
|
|
|
|
|
YES (The service data log for HDD is displayed.) : Abnormalities relating to high or low temperature may be present. Check if the multivision display can output the sound at the operable temperature. If it cannot output the sound, go to Step 3.
|
|
|
|
|
|
(1)Display "Network/Connect Line Check" in the MMCS service mode. (Refer to .)
|
|
|
(2)Check if "DVD Drive OK" is displayed.
|
|
|
(3)Check if "HDD Drive OK" is displayed.
|
|
|
(4)Check if "Premium Audio OK" is displayed.
|
|
|
Q.
Is the check result normal?
|
|
|
Q.
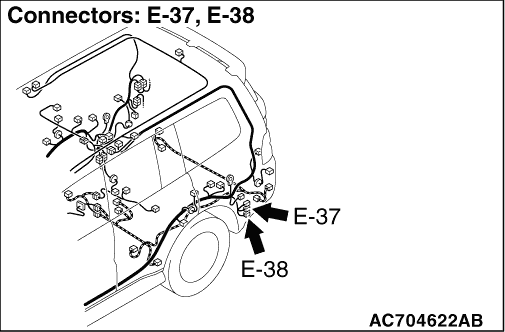
Is audio amplifier connector E-37 in good condition?
|
|
|
 Repair or replace the damaged component(s).
|
|
|
|
|
|
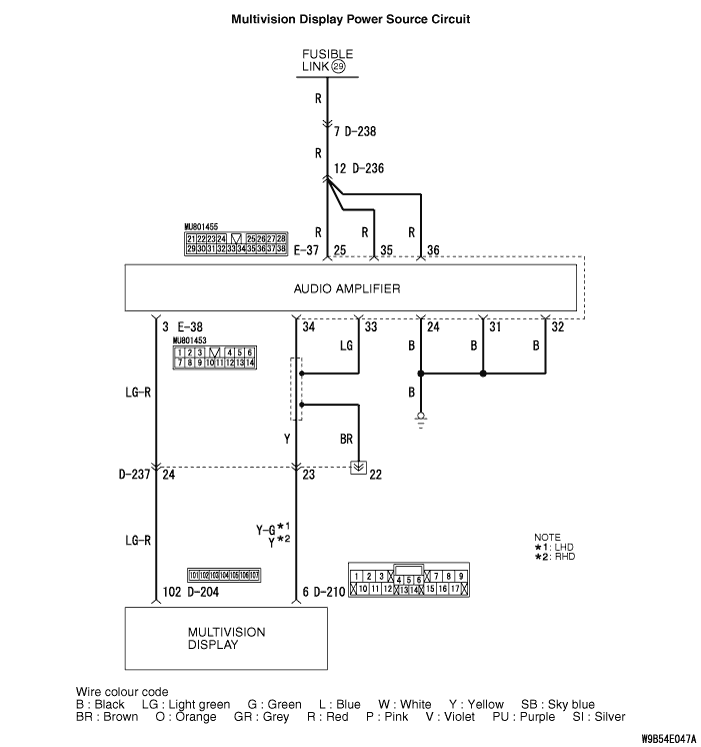
(1)Disconnect audio amplifier connector E-37, and measure the resistance available at the wiring harness side of the connector.
|
|
|
(2)Measure the resistance between terminal 24 and earth.
OK: Continuity exists (2 ohms or less)
|
|
|
(3)Measure the resistance between terminal 31 and earth.
OK: Continuity exists (2 ohms or less)
|
|
|
(4)Measure the resistance between terminal 32 and earth.
OK: Continuity exists (2 ohms or less)
|
|
|
Q.
Is the check result normal?
|
|
|
- Check the earth wires for open circuit.
|
|
|
Q.
Is the check result normal?
|
|
|
 The trouble can be an intermittent malfunction (Refer to GROUP 00 - How to use Troubleshooting/inspection Service Points - How to Cope with Intermittent Malfunction ).
|
|
|
|
|
|
Repair the wiring harness.
|
|
|
|
|
|
(1)Disconnect audio amplifier connector E-37, and measure the voltage available at the wiring harness-side connector.
|
|
|
(2)Measure the voltage between terminal 25 and earth.
OK: System voltage
|
|
|
(3)Measure the voltage between terminal 35 and earth.
OK: System voltage
|
|
|
(4)Measure the voltage between terminal 36 and earth.
OK: System voltage
|
|
|
Q.
Is the check result normal?
|
|
|
- Check the power supply line for open circuit and short circuit.
|
|
|
Q.
Is the check result normal?
|
|
|
Repair the wiring harness.
|
|
|
|
|
|
Q.
Is the check result normal?
|
|
|
Repair the defective connector.
|
|
|
|
|
|
- Check the communication lines for open circuit and short circuit.
|
|
|
Q.
Is the check result normal?
|
|
|
Repair the wiring harness.
|
|
|
|
|
|
then check that the audio sound is output.
|
|
|
Q.
Is the check result normal?
|
|
|
The trouble can be an intermittent malfunction (Refer to GROUP 00 - How to use Troubleshooting/inspection Service Points - How to Cope with Intermittent Malfunction ).
|
|
|
|
|
|
Temporarily replace the multivision display, and check if the sound is output.
|
|
|
Q.
Is the check result normal?
|
|
|
Replace the multivision display.
|
|
|
|
|
|
Replace the audio amplifier.
|
|
|
|