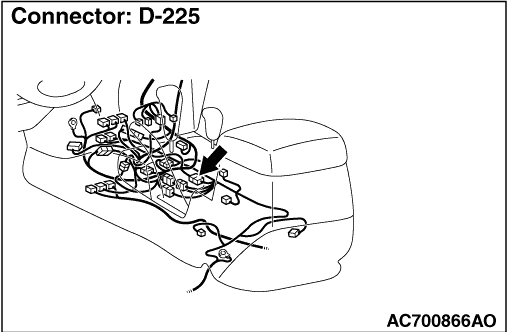
|
|
Either of diagnosis codes P1770 (P0705) or P1771 (P0705) is set, inhibitor switch is defective.
|
|
|
Q.
Are diagnosis codes P1770 (P0705) or P1771 (P0705) set?
|
|
|
YES diagnosis code P1770 (P0705) is set : Refer to diagnosis code P1770 (P0705): Inhibitor switch system  . .
|
|
|
|
|
|
YES diagnosis code P1771 (P0705) is set : Refer to diagnosis code P1771 (P0705): Inhibitor switch system .
|
|
|
|
|
|
- Item 27: Select switch
- Item 28: Upshift switch
- Item 29: Downshift switch
|
|
|
Check the above data list (Refer to data list reference table ).
|
|
|
Q.
Is the check result normal?
|
|
|
 Intermittent malfunction (Refer to GROUP 00 - How to Cope with Intermittent Malfunction ). Intermittent malfunction (Refer to GROUP 00 - How to Cope with Intermittent Malfunction ).
|
|
|
|
|
|
NO "NG" for all items : Go to Step 3. : Go to Step 3.
|
|
|
|
|
|
NO "NG" for item 27 : Go to Step 10.
|
|
|
|
|
|
NO "NG" for item 28 : Go to Step 16.
|
|
|
|
|
|
NO "NG" for item 29 : Go to Step 22.
|
|
|
|
|
|
Q.
Is the check result normal?
|
|
|
 Replace the selector lever assembly. Replace the selector lever assembly.
|
|
|
|
|
|
Check for the contact with terminals.
|
|
|
Q.
Is the check result normal?
|
|
|
Repair the defective connector.
|
|
|
|
|
|
(1)Disconnect the connector, and measure the voltage between terminal No.4 and earth at the wiring harness side.
|
|
|
(2)Turn the ignition switch to the ON position.
OK: System voltage
|
|
|
Q.
Is the check result normal?
|
|
|
Check for the contact with terminals.
|
|
|
Q.
Is the check result normal?
|
|
|
Repair the defective connector.
|
|
|
|
|
|
Check the power supply line for short and open circuit.
|
|
|
Q.
Is the check result normal?
|
|
|
Repair the wiring harness.
|
|
|
|
|
|
Check for the contact with terminals.
|
|
|
Q.
Is the check result normal?
|
|
|
Repair the defective connector.
|
|
|
|
|
|
- Item 27: Select switch
- Item 28: Upshift switch
- Item 29: Downshift switch
|
|
|
Check the above data list (Refer to data list reference table ).
|
|
|
Q.
Is the check result normal?
|
|
|
Intermittent malfunction (Refer to GROUP 00 - How to Cope with Intermittent Malfunction ).
|
|
|
|
|
|
Replace the engine-A/T-ECU.
|
|
|
|
|
|
Q.
Is the check result normal?
|
|
|
Replace the selector lever assembly.
|
|
|
|
|
|
Check for the contact with terminals.
|
|
|
Q.
Is the check result normal?
|
|
|
Repair the defective connector.
|
|
|
|
|
|
(1)Disconnect the connector, and measure the voltage between terminal 85 and earth at the wiring harness side.
|
|
|
(2)Selector lever position: Sport mode.
|
|
|
(3)Turn the ignition switch to the ON position.
OK: System voltage
|
|
|
Q.
Is the check result normal?
|
|
|
Check for the contact with terminals.
|
|
|
Q.
Is the check result normal?
|
|
|
Repair the defective connector.
|
|
|
|
|
|
Check for the contact with terminals.
|
|
|
Q.
Is the check result normal?
|
|
|
Repair the defective connector.
|
|
|
|
|
|
Check the output line for short circuited and open circuit.
|
|
|
Q.
Is the check result normal?
|
|
|
Repair the wiring harness.
|
|
|
|
|
|
Q.
Is the check result normal?
|
|
|
Replace the selector lever assembly.
|
|
|
|
|
|
Check for the contact with terminals.
|
|
|
Q.
Is the check result normal?
|
|
|
Repair the defective connector.
|
|
|
|
|
|
(1)Disconnect the connector, and measure the voltage between terminal 77 and earth at the wiring harness side.
|
|
|
(2)Selector lever position: Upshift and hold the selector lever.
|
|
|
(3)Turn the ignition switch to the ON position.
OK: System voltage
|
|
|
Q.
Is the check result normal?
|
|
|
Check for the contact with terminals.
|
|
|
Q.
Is the check result normal?
|
|
|
Repair the defective connector.
|
|
|
|
|
|
Check for the contact with terminals.
|
|
|
Q.
Is the check result normal?
|
|
|
Repair the defective connector.
|
|
|
|
|
|
Check the output line for short circuited and open circuit.
|
|
|
Q.
Is the check result normal?
|
|
|
Repair the wiring harness.
|
|
|
|
|
|
Q.
Is the check result normal?
|
|
|
Replace the selector lever assembly.
|
|
|
|
|
|
Check for the contact with terminals.
|
|
|
Q.
Is the check result normal?
|
|
|
Repair the defective connector.
|
|
|
|
|
|
(1)Disconnect the connector, and measure the voltage between terminal 68 and earth at the wiring harness side.
|
|
|
(2)Selector lever position: Downshift and hold the selector lever.
|
|
|
(3)Turn the ignition switch to the ON position.
OK: System voltage
|
|
|
Q.
Is the check result normal?
|
|
|
Check for the contact with terminals.
|
|
|
Q.
Is the check result normal?
|
|
|
Repair the defective connector.
|
|
|
|
|
|
Check for the contact with terminals.
|
|
|
Q.
Is the check result normal?
|
|
|
Repair the defective connector.
|
|
|
|
|
|
Check the output line for short circuited and open circuit.
|
|
|
Q.
Is the check result normal?
|
|
|
Repair the wiring harness.
|
|
|
|