REMOVAL AND INSTALLATION


caution *:Indicates parts which should be temporarily tightened, and then fully tightened with the vehicle on the earth in the unladen condition.
Pre-removal and Post-installation Operation
  • Under Cover Removal and Installation (Refer to GROUP 51, Under Cover .)
  • Front Axle Gear Oil Level Check (Refer to .)
  • Driveshaft Removal and Installation (Refer to .)
  • Inner Shaft Removal and Installation (Refer to .)


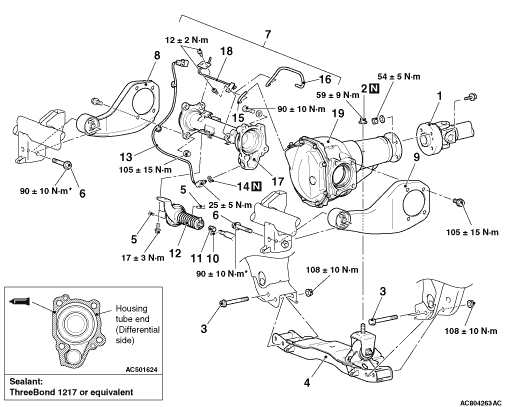
Removal steps
<<A>>
>>B<<
1.
Front propeller shaft connection


·
Support the differential by a transmission jack


2.
Self-locking nut


3.
Front suspension rear crossmember assembly mounting bolt


4.
Front suspension rear crossmember assembly

>>A<<
5.
Vacuum hose connection


6.
Differential mounting bracket bolt


7.
Housing tube, front differential carrier and differential mounting bracket


8.
Differential mounting bracket <RH>


9.
Differential mounting bracket <LH>


10.
Pin <Except for Russia>


11.
Collar <Except for Russia>


12.
Actuator assembly <Except for Russia>


13.
Free wheel engage switch assembly <Except for Russia>


14.
Gasket <Except for Russia>


15.
Breather hose <Vehicles with Easy select 4WD>


16.
Breather hose <Vehicles with Super select 4WD>


17.
Housing tube assembly


18.
Breather pipe


19.
Front differential carrier assembly

REMOVAL SERVICE POINT


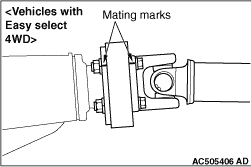
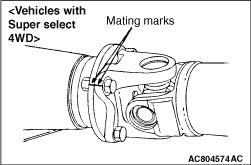
<<A>> FRONT PROPELLER SHAFT REMOVAL


Make mating marks on the flange yoke and the differential carrier companion flange. Remove the front propeller shaft.

INSTALLATION SERVICE POINTS


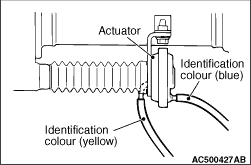
>>A<< VACUUM HOSE INSTALLATION


Install the vacuum hoses so that they match the identification colours of the actuator assembly nipple.

>>B<< FRONT PROPELLER SHAFT INSTALLATION


Install the front propeller shaft so that the mating marks of the flange yoke and the differential carrier companion flange are aligned.