|
|
To introduce the serpentine drive system with the alternator drive belt auto-tensioner, the following operations will be required.
|


|
1.
| caution |
To reuse the alternator and others belt, draw an arrow indicating the rotating direction on the back of the alternator and others belt using chalk to install the same direction.
|
Rotate the pulley bolt of the alternator drive belt auto-tensioner anti-clockwise with an offset wrench [45 degrees, a long offset wrench (5/8 x 11/16 inches) recommended], and insert the hexagon wrench into the alternator drive belt auto-tensioner hole to fix the alternator drive belt auto-tensioner.
2.Remove the alternator and others belt.
|
|
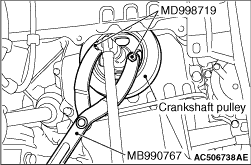
1.Use the following special tools to support the crankshaft pulley:
- Front hub and flange yoke holder (MB990767)
- Pin (MD998719)
2.Loosen the crankshaft pulley centre bolt and remove the crankshaft pulley washer and crankshaft pulley.
|

|
1.Wipe off the dirt on the crankshaft and the crankshaft pulley as shown in the figure using a rag.
2.Wipe off the dirt on the crankshaft sprocket, the crankshaft and the crankshaft pulley as shown in the figure using a rag, and then degrease them.
| note |
Degrease them to prevent drop in the friction coefficient of the pressed area, which is caused by oil adhesion.
|
3.Install the crankshaft pulley.
4.Wipe off the dirt on the crankshaft pulley washer and the crankshaft pulley centre bolt as shown in the figure using a rag.
5.Apply an adequate and minimum amount of engine oil to the threads of the crankshaft pulley centre bolt and the lower area of the flange.
|
|
6.Use the following special tools as during removal to support the crankshaft pulley:
- Front hub and flange yoke holder (MB990767)
- Pin (MD998719)
|

|
7.Tighten the crankshaft pulley centre bolt according to the following procedure.
(1)
Tighten the crankshaft pulley centre bolt to the specified torque 250 N·m.
(2)
Loosen the crankshaft pulley centre bolt fully.
(3)
Tighten the crankshaft pulley centre bolt to the specified torque 110 N·m.
(4)
As shown in the illustration "A," apply the paint mark to the crankshaft pulley on the extended line of the corner adjacent to the one of the crankshaft pulley centre bolt corners.
(5)
|
|
| caution |
- When the tightening angle is smaller than the specified tightening angle, the appropriate tightening capacity cannot be secured.
- When the tightening angle is larger than the specified tightening angle, remove the bolt to start from the beginning again according to the procedure.
|
|
Tighten the crankshaft pulley centre bolt by 60° once more. Make sure the paint mark of crankshaft pulley centre bolt is aligned with the paint mark of crankshaft pulley as shown in the illustration "B."
|


|
1.
| caution |
- To reuse the alternator and others belt, install it by aligning the arrow mark on the backside of belt marked at the removal with the rotating direction.
- Check that the notches of the notched pulley and the notches of the alternator and others belt are fit correctly.
- Check that the alternator and others belt is installed in the centre of the flat surface of the flat pulley.
|
Install the alternator and others belt to each pulley as shown in the figure.
|

|
2.Set an offset wrench [45 °, a long offset wrench (5/8 x 11/16 inches) recommended] to the pulley bolt of the alternator drive belt auto-tensioner. Then, rotate the alternator drive belt auto-tensioner anti-clockwise and remove the L-shaped hexagon wrench fixing the alternator drive belt auto-tensioner.
3.Apply tension to the alternator and others belt while slowly turning the alternator drive belt auto-tensioner clockwise.
|

