|
|
1.Remove the engine oil pan mounting bolts.
|

|
2.Use special tool oil pan FIPG cutter (MD998727) to remove the engine oil pan.
|
|
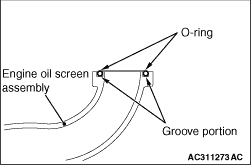
Confirm that the O-ring is securely fitted in the engine oil screen assembly groove without causing any torsion or damage. Then install the engine oil screen assembly.
|
|
|
1.Remove sealant from the engine oil pan and cylinder block surfaces.
|

|
2.
| caution |
- As oil leak is likely to occur at both ends of the rear side of the engine oil pan, be sure to apply the specified sealant as shown.
- After the installation, until a sufficient period of time (one hour or more) elapses, do not apply the oil or water to the sealant application area or start the engine.
|
Apply a bead of the specified sealant to the cylinder block mating surface of the engine oil pan, and install the engine oil pan to the cylinder block within 5 minutes.
Specified sealant: LOCTITE 5971 or exact equivalent
3.Tighten the engine oil pan mounting bolts to the specified torque.
Tightening torque: 9.5 ± 0.5 N·m
|

