|
|
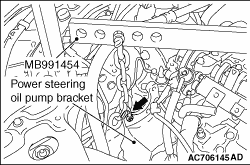
1.Remove the power steering oil pump assembly with hose on it.
|
|
|
2.Tie the removed power steering oil pump with a string at a position where it will
not interfere with the removal and installation of timing chain.
|
|
|
Install a special tool for holding the engine and transmission assembly.
|

|
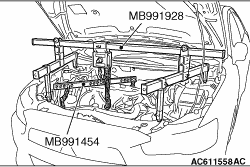
1.<When special tool engine hanger (MB991928) is used>
(1)
Assemble special tool engine hanger (MB991928). (Set the following
parts on the base hanger.)
- Slide bracket (HI)
- Foot x 4 (standard) (MB991932)
- Joint x 2 (140) (MB991931)
(2)
Set the foot of the special tool as shown in the figure.
|
|
| note |
Slide the slide bracket (HI) to adjust the engine hanger balance.
|
|
(3)
Mount special tool engine hanger balancer (MB991454) to the power steering oil pump bracket
and the engine hanger, and set it to special tool MB991928 to support the engine and transmission
assembly.
|

|
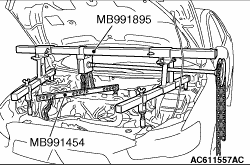
2.<When special tool engine hanger (MB991895) is used>
(1)
Set the foot of special tool engine hanger (MB991859) as shown in the figure.
|
|
| note |
Slide the foot to adjust the engine hanger balance.
|
|
(2)
Mount special tool engine hanger balancer (MB991454) to the power steering
oil pump bracket and the engine hanger, and set it to special tool MB991895 to support the engine
and transmission assembly.
|
|
|
When removing the crankshaft pulley, slightly loosen the water pump pulley mounting bolts
before removal of the drive belt.
|
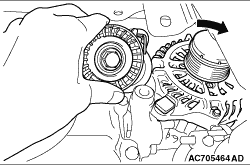
|
Loosen the mounting bolt of alternator assembly lower part, and remove the mounting bolt
of alternator assembly upper part. Slide the alternator assembly, and remove the alternator drive
belt auto-tensioner.
|
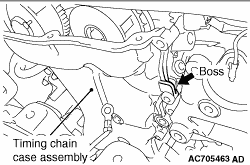
|
1.
| caution |
If the adhesive strength of sealant on the timing chain
case assembly is so strong that the boss may be damaged by peeling off, do not peel it off forcibly.
|
After removing the timing chain case assembly mounting bolts, slightly pry the boss of
the timing chain case assembly shown in the figure using a flat-tipped screwdriver, and remove
the timing chain case assembly from the cylinder head and cylinder block.
|

|
2.If the sealant cannot be peeled off easily, insert a wooden hammer shank into the timing
chain case assembly inside as shown in the figure, pry slightly, and remove the timing chain
case assembly from the cylinder head and cylinder block.
|
|
|
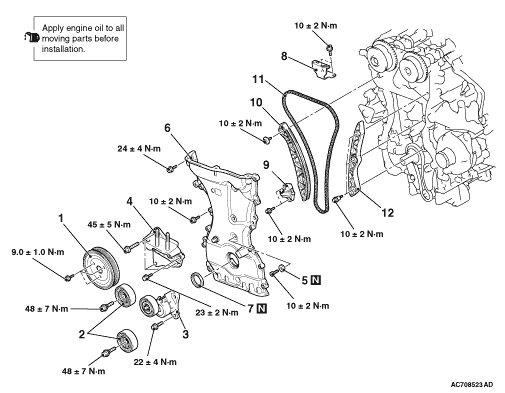
1.Temporarily install the crankshaft pulley to the crankshaft.
|

|
2.
| caution |
Turn the crankshaft clockwise.
|
Turn the crankshaft clockwise to align the sprocket timing marks as shown in the figure
and set the cylinder No. 1 to the top dead centre of compression
| note |
At this time, it is not necessary that the link plate (orange or blue) of the timing chain
always aligns with each sprocket timing mark.
|
3.Remove the crankshaft pulley installed temporarily.
|

|
4.Using a precision flat-tipped screwdriver, release the ratchet of timing chain tensioner.
5.Compress the plunger of timing chain tensioner and insert hard wire (such as the piano
wire) or the L-shaped hexagon wrench (1.5 mm) to fix the plunger of the timing chain tensioner.
6.Remove the timing chain tensioner.
|
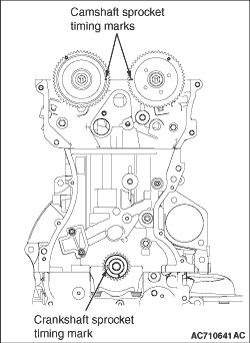
|
1.Set the timing marks of the camshaft sprockets and the crankshaft sprocket as shown in
the figure.
|

|
2.Align each sprocket timing chain mating mark with the link plate (orange or blue) of timing
chain to avoid slack of the timing chain tension side, and install the timing chain to the sprockets.
|

|
1.Check that the sprocket timing chain mating marks align with the link plates (orange or
blue) of the timing chain, and install the timing chain tensioner to the cylinder block.
|

|
2.Remove the hard wire or L-shaped hexagon wrench fixing the plunger of the timing chain
tensioner to apply tension to the timing chain.
|
|
|
1.Apply a small amount of engine oil to the entire inner diameter of the crankshaft
front oil seal lip.
|

|
2.
| caution |
When installing the crankshaft front oil seal, be careful
to avoid damage to the crankshaft front oil seal.
|
Using special tool bush remover and installer base (MB991448), press in the crankshaft
front oil seal up to the chamfered surface of timing chain case.
|
|
|
1.
| caution |
- Be sure to remove the sealant remaining
in the mounting hole, O-ring groove, and gap between parts.
- Use the quick-drying degreasing agent (white gasoline) to degrease, then check that
no grease is remaining on the sealant application area.
- After degreasing with the quick-drying degreasing agent (white gasoline), never
touch the degreased area with fingers.
|
Remove all the traces of sealant adhering to the timing chain case assembly installation
surfaces of timing chain case assembly, cylinder block, and cylinder head. Then, degrease the
surfaces with the quick-drying degreasing agent (white gasoline).
|
|
|
2.Remove all the sealant adhering to the gasket between the cylinder head and cylinder
block (three-surface aligned part). Then, degrease the surfaces with the quick-drying degreasing
agent (white gasoline).
|
|
|
3.As for the three-surface aligned part that is indicated in Step 2 above, the engine
oil oozes from the cylinder head gasket. Thus, quickly apply the sealant to it after degreasing.
|
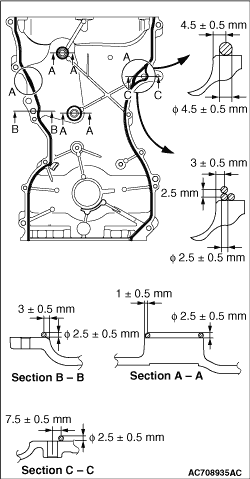
|
4.To the timing chain case assembly mating surface, apply the sealant with a width of 2.5 ± 0.5
mm and without a gap. However, with the "A" shown in the figure, apply the sealant with a width
of 4.5 ± 0.5 mm or with overlapping widths of 2.5 ± 0.5 mm as shown in the figure.
Specified sealant: Three bond 1217G
5.
| caution |
- If the sealant contacts
any other part during installation of the timing chain case assembly, apply sealant again before
installing the timing chain case assembly.
- After the installation, until a sufficient period of time (one hour or more) elapses,
do not apply the oil or water to the sealant application area or start the engine.
|
Within three minutes after the application of sealant, install the timing chain case assembly
to the cylinder block and cylinder head so that the sealant does not contact other parts.
|
|
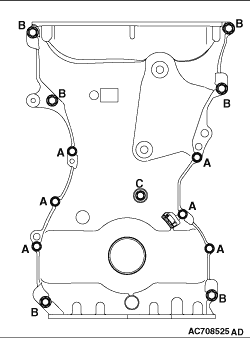
6.To the installation positions shown in the figure, tighten the timing chain case assembly
mounting bolts to the specified torque shown below.
|
|
Bolt (symbol)
|
Thread diameter x Length mm
|
Tightening torque
|
Flange bolt (A)
|
M6 × 25
|
10 ± 2 N·m
|
Flange bolt (B)
|
M8 × 28
|
24 ± 4 N·m
|
Bolt (C)
|
M6 × 25
|
10 ± 2 N·m
|
|
|
|
|
Temporarily tighten the water pump pulley mounting bolts. Then, tighten them to the specified
torque after the installation of alternator and others belt.
|
|
|
Tightening torque: 9.0 ± 1.0 N·m
|