REMOVAL AND INSTALLATION


<FUEL TANK ASSEMBLY>


Pre-removal operation
  • Fuel Pump Connector Disconnection [Refer to GROUP 13C - On-vehicle Service, Fuel Pump Connector Disconnection (How to Reduce Pressurized Fuel Lines) ].
  • Fuel Draining.
  • Propeller Shaft Removal (Refer to GROUP 25 - Propeller Shaft ).
  • Centre Exhaust Pipe Removal (Refer to GROUP 15 - Exhaust Pipe, Main Muffler and Catalytic Converter ).
  • Rear Seat Cushion Assembly Removal (Refer to GROUP 52A - Rear Seat Assembly ).

Post-installation operation
  • Rear Seat Cushion Assembly Installation (Refer to GROUP 52A - Rear Seat Assembly ).
  • Centre Exhaust Pipe Installation (Refer to GROUP 15 - Exhaust Pipe, Main Muffler and Catalytic Converter ).
  • Propeller Shaft Installation (Refer to GROUP 25 - Propeller Shaft ).
  • Fuel Refilling.
  • Fuel Leak Check.


Removal steps
<<A>>

1.
Fuel tank pump and gauge assembly connector connection
<<A>>

2.
Fuel return hose connection
<<A>>
>>B<<
3.
Fuel main pipe connection
<<B>>

4.
Fuel tank gauge unit connector connection


5.
Fuel tank vapour hose connection


6.
Front floor under cover


7.
Parking brake rear cable clamp connection
<<C>>

8.
Fuel levelling hose connection
<<C>>
>>A<<
9.
Fuel filler hose connection
<<C>>

10.
Fuel tank band
<<C>>

11.
Fuel tank assembly

<FUEL FILLER NECK ASSEMBLY>


Removal steps


1.
Fuel levelling hose connection

>>A<<
2.
Fuel filler hose connection


3.
Fuel filler hose protector


4.
Fuel tank cap


5.
Fuel filler neck assembly


6.
Filler neck boots

REMOVAL SERVICE POINTS


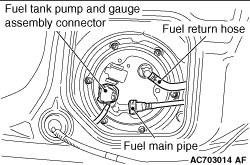
<<A>> FUEL TANK PUMP AND GAUGE ASSEMBLY CONNECTOR DISCONNECTION/FUEL RETURN HOSE DISCONNECTION/FUEL MAIN PIPE DISCONNECTION


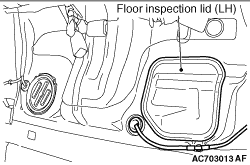
1.Remove the floor inspection lid (LH).

2.Disconnect the fuel tank pump and gauge assembly connector.
3.Disconnect the fuel return hose.

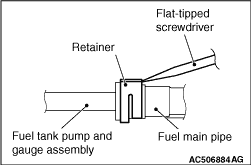
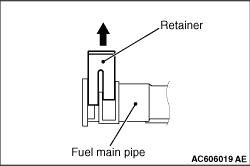
4.Insert a flat-tipped screwdriver (6 mm wide and 1 mm thick) into the retainer of the fuel main pipe.

5.
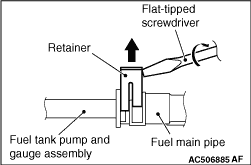
caution When pushing up the retainer of the fuel main pipe connector, pay attention to avoid damage to the retainer.
Turn the flat-tipped screwdriver inserted into the retainer by 90 degrees to push up the retainer, and disconnect the fuel main pipe from the fuel tank pump and gauge assembly.

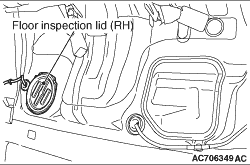
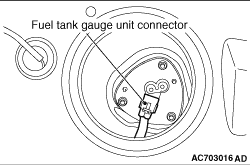
<<B>> FUEL TANK GAUGE UNIT CONNECTOR DISCONNECTION


1.Remove the floor inspection lid (RH).

2.Disconnect the fuel tank gauge unit connector.

<<C>> FUEL LEVELLING HOSE DISCONNECTION/FUEL FILLER HOSE DISCONNECTION/FUEL TANK BAND/FUEL TANK ASSEMBLY REMOVAL


1.Hold the fuel tank assembly with the transmission jack, and remove the connecting bolts of fuel tank band and the connecting nuts of fuel tank assembly.
2.Lower the transmission jack slightly to disconnect the fuel levelling hose and the fuel filler hose.
3.Tilt and remove the fuel tank assembly while avoiding the rear differential carrier.

INSTALLATION SERVICE POINTS


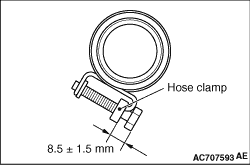
>>A<< FUEL FILLER HOSE CONNECTION


After connecting the fuel filler hose, tighten the bolts of hose clamp so that the tightening dimension is 8.5 ± 1.5 mm.

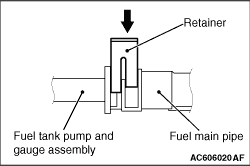
>>B<< FUEL MAIN PIPE CONNECTION


1.Before the installation, push up the retainer of the fuel main pipe.

2.Connect the connector of fuel main pipe to the fuel tank pump and gauge assembly securely and push down the retainer of the connector to lock it firmly.
3.After the installation, slightly pull the fuel main pipe to check that it is connected securely. At this time, also check that there is approximately 1 mm play.