REMOVAL AND INSTALLATION <4A9>


Pre-removal Operation
  • Engine Coolant Draining (Refer to ).
  • Air Cleaner Assembly Removal (Refer to GROUP 15 - Air Cleaner ).

Post-installation Operation
  • Air Cleaner Assembly Installation (Refer to GROUP 15 - Air Cleaner ).
  • Engine Coolant Refilling and Level Check (Refer to ).
  • A/T Fluid Level Check (Refer to GROUP 23C - On-vehicle Service, Essential Service, Automatic Transmission Fluid Check ) <A/T>.


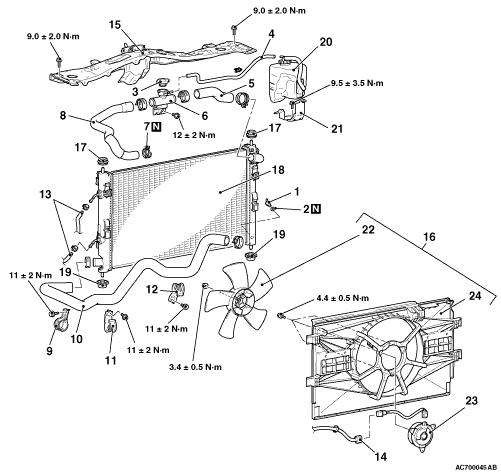
Radiator removal steps


·
Engine room under cover front A and B (Refer to GROUP 51 - Under Cover )


1.
Radiator drain plug


2.
O-ring


3.
Radiator cap


4.
Radiator condenser tank hose
<<A>>
>>A<<
5.
Radiator upper hose


6.
Radiator cap assembly
<<A>>
>>A<<
7.
Hose clip
<<A>>
>>A<<
8.
Radiator upper hose


9.
Radiator hose clamp
<<A>>
>>A<<
10.
Radiator lower hose


11.
Radiator hose bracket


12.
Radiator hose bracket


13.
A/T fluid cooler hose connection <A/T>


14.
Radiator fan motor connector connection


·
Headlamp support upper panel cover (Refer to GROUP 51 - Front Bumper Assembly and Radiator Grille )


·
Hood lock release cable, hood latch (Refer to GROUP 42A - Hood )


·
Front impact sensor (Refer to GROUP 52B - Front Impact Sensor )


15.
Headlamp support panel upper
<<B>>

16.
Radiator fan, radiator fan motor and fan shroud assembly


17.
Support upper insulator


18.
Radiator assembly


19.
Support lower insulator


20.
Radiator condenser tank


21.
Radiator condenser tank bracket


Fan shroud removal steps


4.
Radiator condenser tank hose
<<A>>
>>A<<
5.
Radiator upper hose


6.
Radiator cap assembly


14.
Radiator fan motor connector connection


·
Headlamp support upper panel cover (Refer to GROUP 51 - Front Bumper Assembly and Radiator Grille )


·
Hood lock release cable, hood latch (Refer to GROUP 42A - Hood )


·
Front impact sensor (Refer to GROUP 52B - Front Impact Sensor )


15.
Headlamp support panel upper
<<B>>

16.
Radiator fan, radiator fan motor and fan shroud assembly


22.
Radiator fan


23.
Radiator fan motor


24.
Fan shroud

REMOVAL SERVICE POINTS


<<A>> RADIATOR UPPER HOSE/HOSE CLIP/RADIATOR LOWER HOSE DISCONNECTION


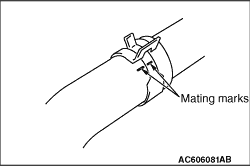
1.Make mating marks on the radiator hose and the hose clamp.

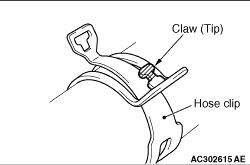
2.Break off the tip of hose clip claw and spread out the hose clip.
note If there is a hose clip claw, the hose clip cannot spread to capacity because the claw contacts the hose clip.
3.Disconnect the radiator hose.

<<B>> RADIATOR FAN, RADIATOR FAN MOTOR AND FAN SHROUD ASSEMBLY REMOVAL


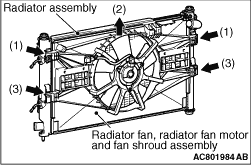
Remove the radiator fan, radiator fan motor and fan shroud assembly from the radiator assembly according to the procedure below.
1.Release the upper locks of the radiator assembly from the radiator fan, radiator fan motor and fan shroud assembly.
2.Slightly raise the radiator fan, radiator fan motor and fan shroud assembly.
3.Release the lower locks of the radiator assembly from the radiator fan, radiator fan motor and fan shroud assembly, and then remove the radiator fan, radiator fan motor and fan shroud assembly.

INSTALLATION SERVICE POINT


>>A<< RADIATOR LOWER HOSE/HOSE CLIP/RADIATOR UPPER HOSE INSTALLATION


1.
caution Never reuse the hose clip whose claw is broken off to prevent the rusting.
Insert a new hose clip into the radiator upper hose.

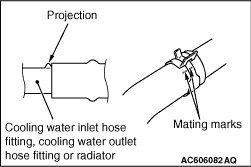
2.Insert radiator hose as far as the projection of the cooling water inlet hose fitting, cooling water outlet hose fitting or radiator.
3.Align the mating marks on the radiator hose and hose clamp, and then connect the radiator hose.
4.Remove the hose clip claw and shorten the hose clip, then install the radiator hose.