|
|
Perform the speaker test, and check which speaker does not output the sound. Refer to  . .
|
|
|
Q.
Is the check result normal?
|
|
|
YES (normal for all) : The trouble can be an intermittent malfunction (Refer to GROUP 00 - How to Cope with Intermittent Malfunction ).
|
|
|
|
|
|
NO (Either a speaker, a tweeter is abnormal) : Go to Step 2. : Go to Step 2.
|
|
|
|
|
|
Q.
Is the check result normal?
|
|
|
 Repair the defective connector. Repair the defective connector.
|
|
|
|
|
|
(1)Remove the speaker or tweeter. Refer to .
|

|
(2)Check that the speaker or tweeter outputs the noise when the voltage of 5 V is applied to the speaker or tweeter connector terminal. <speaker or tweeter>
Q.
Do the speaker or tweeter output the noise?
 Go to Step 4. Go to Step 4.
Replace the speaker or tweeter.
|
|
|
Q.
Is the check result normal?
|
|
|
Repair the defective connector.
|
|
|
|
|
|
Check the communication lines for open circuit and short circuit.
|
|
|
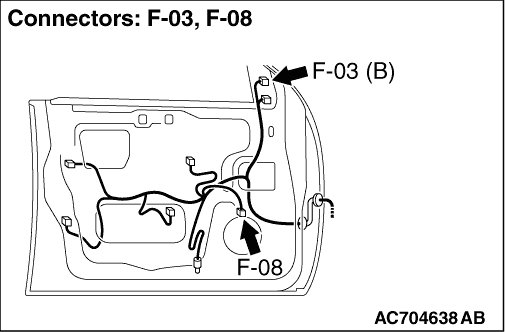
- <Front door speaker (LH)> Check the wire harness between F-08 front door speaker (LH) connector terminal No.1, 2 and E-37 audio amplifier connector terminal No.28, 38.
| note |
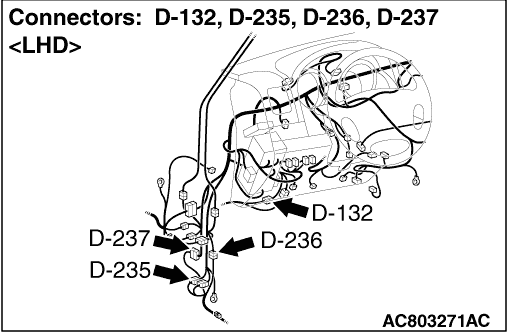
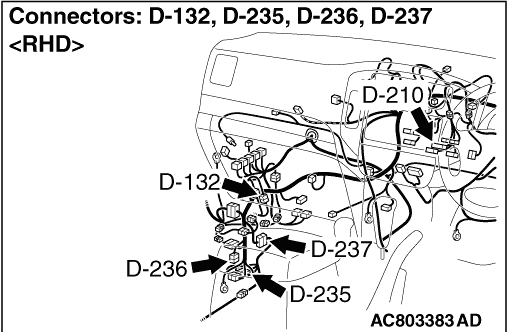
Prior to the wiring harness inspection, check intermediate connectors D-132 and D-236, and repair if necessary.
|
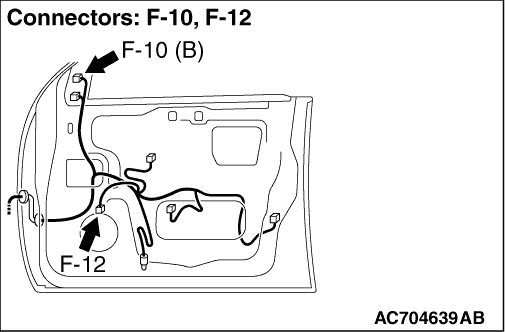
- <Front door speaker (RH)> Check the wire harness between F-12 front door speaker (RH) connector terminal No.1, 2 and E-37 audio amplifier connector terminal No.27, 37.
| note |
Prior to the wiring harness inspection, check intermediate connectors D-115 and D-235, and repair if necessary.
|
- <Rear speaker (LH)> Check the wire harness between E-14 rear speaker (LH) connector terminal No.1, 2 and E-37 audio amplifier connector terminal No.21, 29.
- <Rear speaker (RH)> Check the wire harness between E-31 rear speaker (RH) connector terminal No.1, 2 and E-37 audio amplifier connector terminal No.22, 30.
| note |
Prior to the wiring harness inspection, check intermediate connectors D-222 and D-235, and repair if necessary.
|
- <Front tweeter (LH)> Check the wire harness between F-03 front tweeter (LH) connector terminal No.1, 2 and E-38 audio amplifier connector terminal No.6, 7.
| note |
Prior to the wiring harness inspection, check intermediate connectors D-132 and D-236, and repair if necessary.
|
- <Front tweeter (RH)> Check the wire harness between F-10 front tweeter (RH) connector terminal No.1, 2 and E-38 audio amplifier connector terminal No.3, 4.
| note |
Prior to the wiring harness inspection, check intermediate connectors D-115 and D-235, and repair if necessary.
|
|
|
|
Q.
Is the check result normal?
|
|
|
YES <Except for tweeter> : Go to Step 6.
|
|
|
|
|
|
YES <tweeter> : Go to Step 8.
|
|
|
|
|
|
Repair the wiring harness.
|
|
|
|
|
|
Q.
Is the check result normal?
|
|
|
Repair the defective connector.
|
|
|
|
|
|
Check the communication lines for open circuit and short circuit.
|
|
|
- <Front door speaker (LH)> Check the wire harness between D-210 multivision display connector terminal No.12, 3 and E-38 audio amplifier connector terminal No.9, 18.
| note |
Prior to the wiring harness inspection, check intermediate connectors D-237, and repair if necessary.
|
- <Front door speaker (RH)> Check the wire harness between D-210 multivision display terminal No.15, 7 and E-38 audio amplifier connector terminal No.8, 17.
| note |
Prior to the wiring harness inspection, check intermediate connectors D-237, and repair if necessary.
|
- <Rear speaker (LH)> Check the wire harness between D-210 multivision display connector terminal No.11, 2 and E-38 audio amplifier connector terminal No.1, 10.
- <Rear speaker (RH)> Check the wire harness between D-210 multivision display connector terminal No.25, 35 and E-38 audio amplifier connector terminal No.16, 8.
| note |
Prior to the wiring harness inspection, check intermediate connectors D-237, and repair if necessary.
|
|
|
|
Q.
Is the check result normal?
|
|
|
Repair the wiring harness.
|
|
|
|
|
|
Check if the sound is output from all the speakers.
|
|
|
Q.
Is the check result normal?
|
|
|
The trouble can be an intermittent malfunction (Refer to GROUP 00 - How to use Troubleshooting/inspection Service Points - How to Cope with Intermittent Malfunction ).
|
|
|
|
|
|
Temporarily replace the multivision display, and check if the sound is output from all the speakers.
|
|
|
Q.
Is the check result normal?
|
|
|
Replace the multivision display.
|
|
|
|
|
|
Replace the audio amplifier.
|
|
|
|