Inspection Procedure 3: No Sound is Heard from one of the Speakers. <Vehicles with Audio Amplifier: Long Wheelbase>


caution Before replacing the multivision display or audio amplifier, ensure that the power supply circuit, the earth circuit, and the communication circuit are normal. (Check that the voltage is 10 V or more.)


COMMENTS ON TROUBLE SYMPTOM


PROBABLE CAUSES


  • Malfunction of speaker
  • Malfunctions of multivision display
  • Malfunction of audio amplifier
  • Damaged harness wires and connectors

DIAGNOSIS PROCEDURE


STEP 1. Checking with speaker test


Perform the speaker test, and check which speaker does not output the sound. Refer to .
note In the following procedure, check the speaker, tweeter or subwoofer that is abnormal.

Q. Is the check result normal?

YES (normal for all) : The trouble can be an intermittent malfunction (Refer to GROUP 00 - How to Cope with Intermittent Malfunction ).
NO (Either a speaker, a tweeter or a subwoofer is abnormal) : Go to Step 2.

STEP 2. Connector check: D-104 centre speaker connector, F-08 <front-LH>, F-12 <front-RH>, F-18 <rear-LH> or F-21 <rear-RH> door speaker connector, F-03 <front-LH>, F-10 <front-RH>, F-18 <rear-LH> or F-22 <rear-RH> tweeter connector, E-39 subwoofer connector


Q. Is the check result normal?

Go to Step 3.
Repair the defective connector.

STEP 3. Check the speaker, tweeter or subwoofer.


(1)Remove the speaker, tweeter or subwoofer. Refer to .

(2)Check that the speaker or tweeter outputs the noise when the voltage of 5 V is applied to the speaker or tweeter connector terminal. <speaker or tweeter>

(3)Check that the subwoofer outputs the noise when the voltage of 5 V is applied to the subwoofer connector terminal. <subwoofer>

Q. Does the front door speaker (RH) output the noise?

Go to Step 4.

Replace the speaker, tweeter or subwoofer.

STEP 4. Connector check: E-36 <centre speaker or back door speaker>, E-37 <front door speaker or sub woofer>, E-38 <front tweeter, rear door speaker or rear tweeter> audio amplifier connector


Q. Is the check result normal?

Go to Step 5.
Repair the defective connector.

STEP 5. Check the wire harness between the speaker, tweeter or subwoofer connector terminal and the audio amplifier connector terminal.


Check the communication lines for open circuit and short circuit.

  • <Centre speaker> Check the wire harness between D-104 centre speaker connector terminal No.1, 2 and E-36 audio amplifier connector terminal No.49, 42.
    note Prior to the wiring harness inspection, check intermediate connector D-235, and repair if necessary.
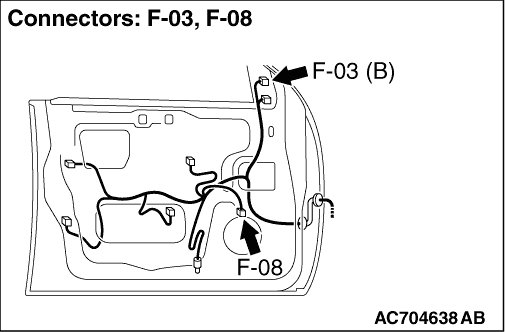
  • <Front door speaker (LH)> Check the wire harness between F-08 front door speaker (LH) connector terminal No.1, 2 and E-37 audio amplifier connector terminal No.28, 38.
    note Prior to the wiring harness inspection, check intermediate connectors D-132 and D-236, and repair if necessary.
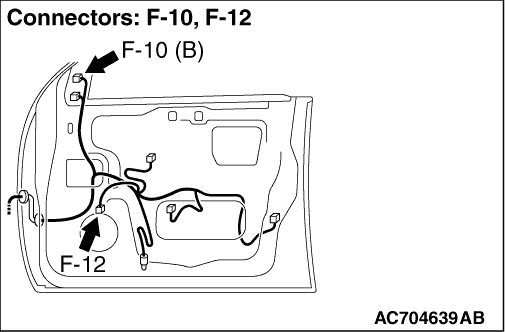
  • <Front door speaker (RH)> Check the wire harness between F-12 front door speaker (RH) connector terminal No.1, 2 and E-37 audio amplifier connector terminal No.27, 37.
    note Prior to the wiring harness inspection, check intermediate connectors D-115 and D-235, and repair if necessary.
  • <Rear door speaker (LH)> Check the wire harness between F-21 rear door speaker (LH) connector terminal No.1, 2 and E-38 audio amplifier connector terminal No.1, 7.
    note Prior to the wiring harness inspection, check intermediate connector E-42, and repair if necessary.
  • <Rear door speaker (RH)> Check the wire harness between F-25 rear door speaker (RH) connector terminal No.1, 2 and E-38 audio amplifier connector terminal No.2, 8.
    note Prior to the wiring harness inspection, check intermediate connectors E-43 and E-122, and repair if necessary.
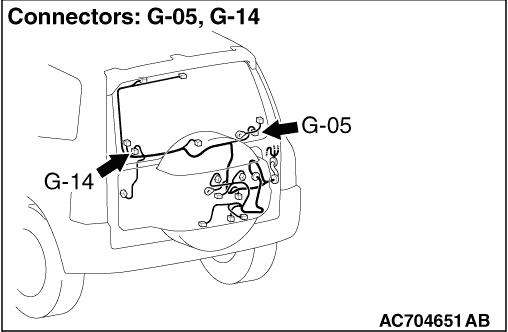
  • <Back door speaker (LH)> Check the wire harness between G-14 back door speaker (LH) connector terminal No.1, 2 and E-36 audio amplifier connector terminal No.51, 44.
    note Prior to the wiring harness inspection, check intermediate connectors E-106 and E-122, and repair if necessary.
  • <Back door speaker (RH)> Check the wire harness between G-05 rear door speaker (RH) connector terminal No.1, 2 and E-36 audio amplifier connector terminal No.50, 43.
    note Prior to the wiring harness inspection, check intermediate connectors E-106 and E-122, and repair if necessary.
  • <Front tweeter (LH)> Check the wire harness between F-03 front tweeter (LH) connector terminal No.1, 2 and E-38 audio amplifier connector terminal No.14, 6.
    note Prior to the wiring harness inspection, check intermediate connectors D-132 and D-236, and repair if necessary.
  • <Front tweeter (RH)> Check the wire harness between F-10 front tweeter (RH) connector terminal No.1, 2 and E-38 audio amplifier connector terminal No.13, 5.
    note Prior to the wiring harness inspection, check intermediate connectors D-132 and D-236, and repair if necessary.
  • <Rear tweeter (LH)> Check the wire harness between F-18 rear tweeter (LH) connector terminal No.1, 2 and E-38 audio amplifier connector terminal No.1, 7.
    note Prior to the wiring harness inspection, check intermediate connector E-42, and repair if necessary.
  • <Rear tweeter (RH)> Check the wire harness between F-22 rear tweeter (RH) connector terminal No.1, 2 and E-38 audio amplifier connector terminal No.2, 8.
    note Prior to the wiring harness inspection, check intermediate connectors E-43 and E-122, and repair if necessary.
  • <Subwoofer> Check the wire harness between E-39 subwoofer connector terminal No.1, 2, 3, 4 and E-37 audio amplifier connector terminal No.30, 22, 29, 21.

Q. Is the check result normal?

YES <front door speaker> : Go to Step 6.
YES <except front door speaker> : Go to Step 8.
NO (harness wire is abnormal) : Repair the wiring harness.

STEP 6. Connector check: D-210 multivision display connector


Q. Is the check result normal?

Go to Step 7.
Repair the defective connector.

STEP 7. Check the harness wire between D-210 multivision display connector terminal No.26, 28, 36, 38 and E-38 audio amplifier connector No.10, 4, 11, 12.


Check the communication lines for open circuit and short circuit.
note Prior to the wiring harness inspection, check intermediate connector D-237, and repair if necessary.

Q. Is the check result normal?

Check the trouble symptom, go to Step 8.
Repair the wiring harness.

STEP 8. Retest the system


Check if the sound is output from all the speakers.

Q. Is the check result normal?

The trouble can be an intermittent malfunction (Refer to GROUP 00 - How to use Troubleshooting/inspection Service Points - How to Cope with Intermittent Malfunction ).
Go to Step 9.

STEP 9. Retest the system


Temporarily replace the multivision display, and check if the sound is output from all the speakers.

Q. Is the check result normal?

Replace the multivision display.
Replace the audio amplifier.