REMOVAL AND INSTALLATION


caution Since the rear propeller shaft is made of CFRP, it is important to observe the following warning items strictly.

  • If a tear, chip or distortion is found on the tube, replace it with new one.
  • Do not drop, shock, or scratch the tube.
  • If the propeller shaft is scratched on the surface, inspect whether it is damaged or not using a dye penetrant (Refer to ).
  • If the propeller shaft is dropped on the ground, replace it with new one. If the dropped rear propeller shaft is reinstalled, the rear propeller shaft may be broken.
  • When working with the propeller shaft, wrap the propeller shaft tube with the rubber sheet of 10 mm thick and over or with the propeller shaft protector (part number MR534564) so that it is not scratched.
  • If a crack or a tear is found on the seal portion at the end of CFRP tube shown in the illustration, replace the tube with new one.
  • Dispose of the damaged CFRP propeller shaft in compliance with local laws. For disposing of CFRP products, we do not recommend incineration.

Pre-removal Operation
  • Under Skid Plate, Engine Room Under Cover Front and Engine Room Under Cover Rear Removal (Refer to GROUP 51, Under Cover ).
  • Transfer Gear Oil Draining Before removing the front propeller shaft (Refer to GROUP 22A, On-vehicle Service .) (Refer to GROUP 23A, On-vehicle Service .), (Refer to GROUP 23C, On-vehicle Service .)
  • Rear Catalytic Converter or Front Exhaust Pipe Removal (Refer to GROUP 15, Exhaust Pipe , .) <4M4-M/T>, Catalytic Converter Removal (Refer to GROUP 15, Exhaust Pipe , .) <4M4-A/T>
  • Front Exhaust Pipe (RH), Front Catalytic Converter and Dash Panel Heat Protector Removal (Refer to GROUP 15 - Exhaust Pipe, Main Muffler and Catalytic Converter .) <6G7>
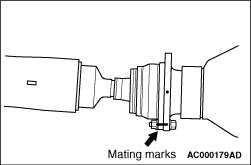
  • Wrap a rubber sheet or propeller shaft protector around the rear CFRP propeller shaft. Before removing the rear CFRP propeller shaft.

Post-installation Operation
  • Remove the rubber sheet or propeller shaft protector wrapped around the rear CFRP propeller shaft and visually check whether the shaft is scratched. After mounting the rear CFRP propeller shaft.
  • Front Exhaust Pipe (RH), Front Catalytic Converter and Dash Panel Heat Protector Installation (Refer to GROUP 15 - Exhaust Pipe, Main Muffler and Catalytic Converter .) <6G7>
  • Rear Catalytic Converter or Front Exhaust Pipe Installation (Refer to GROUP 15, Exhaust Pipe , .) <4M4-M/T>, Catalytic Converter Installation (Refer to GROUP 15, Exhaust Pipe , .) <4M4-A/T>
  • Transfer Gear Oil Supplying After mounting the front propeller shaft Refer to GROUP 22A, On-vehicle Service .) (Refer to GROUP 23A, On-vehicle Service .), (Refer to GROUP 23C, On-vehicle Service .)
  • Under skid plate and Engine Room Under Cover Installation (Refer to GROUP 51, Under Cover .)


Removal steps
<<A>>
>>B<<
1.
Front propeller shaft assembly
<<B>>
>>A<<
2.
Rear propeller shaft assembly

REMOVAL SERVICE POINTS


<<A>> FRONT PROPELLER SHAFT ASSEMBLY REMOVAL


<4M4>

1.Make mating marks on the differential companion flange and the flange yoke.
2.Support the No.2 crossmember assembly with a transmission jack, and disconnect the connection of the No.2 crossmember assembly and the front frame (Refer to GROUP 26 - Differential Carrier and Free Wheeling Clutch Assembly ).

3.
caution Be careful to avoid damage to the vacuum hoses.
Lower the No.2 crossmember assembly to the position where the front propeller shaft can be removed.

4.
caution Be careful not to bend the joint portion when removing the propeller shaft, because this will damage the joint boot.
Disconnect the front propeller shaft assembly after placing a rag around the joint boot portion and hang it at the body-side using wires.
5.Cover the transfer case opening to prevent foreign material from entering.
6.After removing the front propeller shaft, install the No.2 crossmember assembly to the front frame (Refer to GROUP 26 - Differential Carrier and Free Wheeling Clutch Assembly ).
<6G7>

7.Make mating marks on the differential companion flange and the flange yoke.

8.
caution Be careful not to bend the joint portion when removing the propeller shaft, because this will damage the joint boot.
Disconnect the front propeller shaft assembly after placing a rag around the joint boot portion and hang it at the body-side using wires.
9.Cover the transfer case opening to prevent foreign material from entering.

<<B>> REAR PROPELLER SHAFT ASSEMBLY REMOVAL


1.
caution When working with the CFRP propeller shaft assembly, wrap the shaft with rubber sheet or propeller shaft protector to prevent damage.
Confirm that the rear propeller shaft assembly is wrapped with the rubber sheet or propeller shaft protector.

2.Make mating marks on the differential companion flange and the outer race of BJ assembly.


3.
caution
  • Do not bend the joint portion when removing the propeller shaft because this will damage the joint boot.
  • Do not drop the air breather at the end portion of propeller shaft differential side into the propeller shaft ball joint.
  • Do not drop, shock, or scratch the propeller shaft.
Remove the rear propeller shaft assembly after placing a rag around the joint boot portion.
4.Cover the transfer case opening to prevent foreign material from entering.

INSTALLATION SERVICE POINTS


>>A<< REAR PROPELLER SHAFT ASSEMBLY INSTALLATION


1.Confirm that the rear propeller shaft assembly is wrapped with the rubber sheet or propeller shaft protector.


2.
caution
  • Work with the CFRP tube of the propeller shaft assembly under the condition that the tube is wrapped with rubber sheet or propeller shaft protector to prevent scratch on the outer surface. Do not drop, shock or scratch the rear propeller shaft.
  • Remove oil and grease from the threads of the mounting bolts and nuts before tightening, or they will loosen.
  • If the propeller shaft is dropped on the ground, replace it with new one. If the dropped rear propeller shaft is reinstalled, the rear propeller shaft may be broken.
  • Do not drop the air breather at the end portion of propeller shaft differential side into the propeller shaft ball joint.
  • Do not damage the oil seal lips on the transfer case.
If reusing the propeller shaft, align the mating marks of differential companion flange and outer race of BJ assembly to install.

3.When installing a new rear propeller shaft assembly, align the mark on the propeller shaft tube with the mark at the side of the differential companion flange.

>>B<< FRONT PROPELLER SHAFT ASSEMBLY INSTALLATION


caution
  • Do not damage the oil seal lips on the transfer case.
  • Remove oil and grease from the threads of the mounting bolts and nuts before tightening, or they will loosen.

If reusing the propeller shaft, align the mating mark to install.