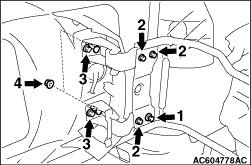
REMOVAL AND INSTALLATION


Pre-removal and post-installation operation
  • Licence plate garnish assembly removal and installation (Refer to GROUP 51 - Garnishes .)
  • Back door lower trim removal and installation (Refer to GROUP 52A - Trims .)
  • Back door waterproof film removal and installation (Refer to .)
  • Rear washer tank assembly removal and installation (Refer to GROUP 51 - Rear Wiper and Washer .)


Licence plate carrier holder removal steps


1.
Licence plate carrier holder assembly


2.
Back door bracket


3.
Licence plate carrier holder


Licence plate carrier assembly / Licence plate carrier hinges removal steps


4.
Harness connector

>>A<<
5.
Licence plate carrier assembly / Licence plate carrier hinges


Licence plate carrier assembly removal steps

>>A<<
6.
Licence plate carrier upper hinge
<<A>>
>>A<<
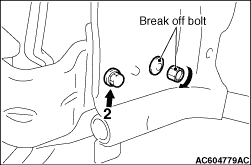
7.
Break-off bolt

>>A<<
8.
Licence plate carrier lower hinge

>>A<<
9.
Licence plate carrier assembly

REMOVAL SERVICE POINT


<<A>> BREAK-OFF BOLT REMOVAL


1.Use a drill to make a hole just deeply enough for the tap to stand on the break-off bolt.
2.Use a left-hand thread tap to remove the break-off bolt.

INSTALLATION SERVICE POINT


>>A<< LICENCE PLATE CARRIER HINGE AND LICENCE PLATE CARRIER ASSEMBLY INSTALLATION


1.Temporarily tighten the break-off bolt, mounting bolts and mounting nut in the order of 1, 2, 3, 4, and then tighten them in the order of 4, 3, 2 to the specified torques.
Tightening torque:
Mounting bolt 2: 7.0 ± 3.0 N·m
Mounting bolts and nut 3, 4: 12 ± 2 N·m
Tighten the break-off bolt until its head is broken off.