|
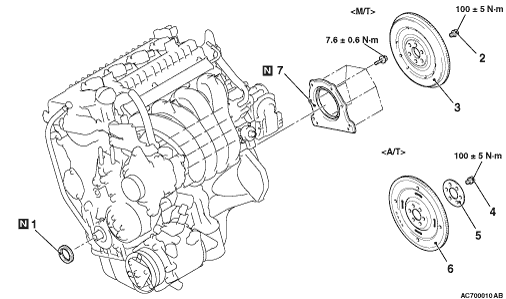
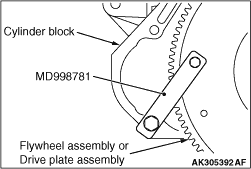
1.Fix the flywheel assembly <M/T> or drive plate assembly <A/T> using special tool flywheel stopper (MD998781).
2.Remove the flywheel bolts <M/T> or drive plate bolts <A/T>.
|
|
|
1.Remove sealant from the crankshaft rear oil seal case assembly mounting surface of the cylinder block.
|
|
|
2.Apply a small amount of engine oil to the outer diameter of special tool oil seal guide (MB992207).
|

|
3.Pass special tool (MB992207) through the crankshaft rear oil seal case assembly in the direction shown in the figure (opposite to the direction of the crankshaft rear oil seal case assembly installation).
| note |
This adjusts the direction of the oil seal lip.
|
|

|
4.Install special tool (MB992207) to the crankshaft rear oil seal case assembly in the opposite direction from the direction in Step 3 (in the direction of the crankshaft rear oil seal case assembly installation).
|
|
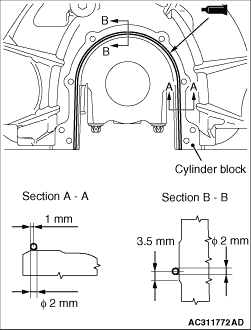
5.Apply a bead of specified sealant to the crankshaft rear oil seal case assembly mating surface of the cylinder block as shown.
Specified sealant: LOCTITE 5971 or exact equivalent
|

|
6.Install the special tool (MB992207) to the crankshaft.
7.
| caution |
- Install the crankshaft rear oil seal case assembly not to damage the crankshaft rear oil seal.
- Do not apply oil or water to the sealant-applied area or start up the engine within 2 hours after the installation of the crankshaft rear oil seal case assembly.
|
Within 3 minutes after applying the specified sealant, install the crankshaft rear oil seal case assembly to the cylinder block.
8.Tighten the crankshaft rear oil seal case assembly mounting bolts to the specified torque.
Tightening torque: 7.6 ± 0.6 N·m
|
|
|
1.Remove the sealant, the engine oil, and other adhering materials from the flywheel assembly <M/T> or drive plate assembly <A/T> installation face, adapter plate <A/T>, crankshaft screw hole, and flywheel bolts <M/T> or drive plate bolts <A/T>.
|
|
|
2.Install the flywheel assembly <M/T> or drive plate assembly <A/T> to the crankshaft.
|
|
3.Fix the flywheel assembly <M/T> or drive plate assembly <A/T> using special tool flywheel stopper (MD998781) in the same manner as removal.
|
|
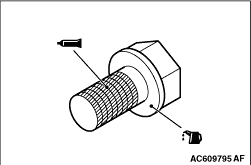
4.Apply a small amount of engine oil to the installation face of the flywheel bolts <M/T> or drive plate bolts <A/T>.
5.Apply specified sealant to the flywheel bolts <M/T> or drive plate bolts <A/T> threads.
Specified sealant: LOCTITE 2701 or equivalent
|
|
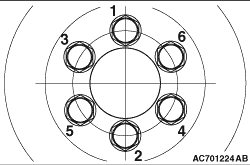
6.Tighten the flywheel bolts <M/T> or drive plate bolts <A/T> to the specified torque in two or three steps in the order shown in the illustration.
Tightening torque: 100 ± 5 N·m
|

|
1.Apply a small amount of engine oil to the outer circumference of special tool crankshaft front oil seal guide (MB991993) and install it to the crankshaft.
2.Apply a small amount of engine oil to the entire inner circumference of the oil seal lip.
3.
| caution |
Install the crankshaft front oil seal not to damage the crankshaft front oil seal.
|
Using special tool differential oil seal installer (MB990699), drive the oil seal so that it is flush with the timing chain case assembly.
|