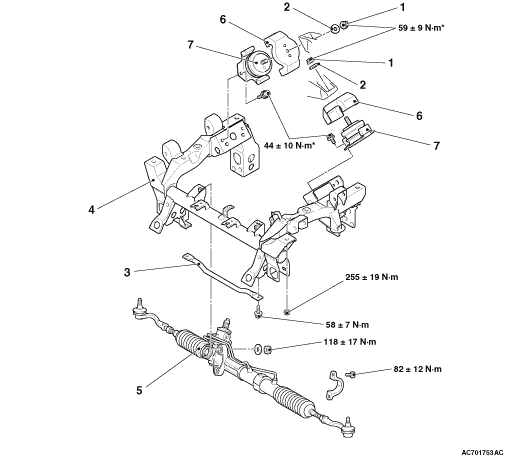
REMOVAL AND INSTALLATION


caution
  • Before removing the steering wheel and air bag module assembly, always refer to GROUP 52B - Service Precautions , Driver’s and Passenger’s (front) Air Bag Module(s) and Clock Spring . Also, set the front wheels so that they are facing straight forward, and remove the ignition key. If you fail to do this, the SRS clock spring will be damaged, causing the SRS air bag to be inoperative and serious injury.
  • *: Indicates parts which should be initially tightened, and then fully tightened after placing the vehicle horizontally and loading the full weight of the engine on the vehicle body.
Pre-removal Operation
  • Under Cover Removal (Refer to GROUP 51 - Under Cover ).
  • Hood Removal (Refer to GROUP 42 - Hood ).
  • Drive Shaft Assembly Removal (Refer to GROUP 26 - Drive Shaft Assembly ).
  • Differential Carrier and No.2 Crossmember Assembly Removal (Refer to GROUP 26 - Differential Carrier and Free Wheeling Clutch Assembly ).
  • Upper Arm Removal (Refer to GROUP 33 - Upper Arm Assembly ).
  • Lower Arm Removal (Refer to GROUP 33 - Lower Arm ).
  • Stabilizer Bar Removal (Refer to GROUP 33 - Stabilizer Bar ).
  • Engine Oil Cooler Removal <6G7> (Refer to GROUP 12 - Engine Oil Cooler ).
  • Air Cleaner Removal <4M4> (Refer to GROUP 15 - Air Cleaner ).
  • Intercooler Removal <4M4> (Refer to GROUP 15 - Intercooler ).
  • Radiator Removal (Refer to GROUP 14 - Radiator ).
  • Power Steering Fluid Draining (Refer to GROUP 37 - On-vehicle Service, Fluid Replacement ).

Post-installation Operation
  • Differential Carrier and No.2 Crossmember Assembly Installation (Refer to GROUP 26 - Differential Carrier and Free Wheeling Clutch Assembly ).
  • Drive Shaft Assembly Installation (Refer to GROUP 26 - Drive Shaft Assembly ).
  • Lower Arm Installation (Refer to GROUP 33 - Lower Arm ).
  • Upper Arm Installation (Refer to GROUP 33 - Upper Arm Assembly ).
  • Stabilizer Bar Installation (Refer to GROUP 33 - Stabilizer Bar ).
  • Air Cleaner Installation <4M4> (Refer to GROUP 15 - Air Cleaner ).
  • Intercooler Installation <4M4> (Refer to GROUP 15 - Intercooler ).
  • Radiator Installation (Refer to GROUP 14 - Radiator ).
  • Engine Oil Cooler Installation <6G7> (Refer to GROUP 12 - Engine Oil Cooler ).
  • Power Steering Fluid Supplying (Refer to GROUP 37 - On-vehicle Service, Fluid Replacement ).
  • Power Steering Fluid Line Bleeding (Refer to GROUP 37 - On-vehicle Service, Power Steering System Air Breeding ).
  • Press the dust cover with a finger to check whether the dust cover is cracked or damaged.
  • Checking Steering Wheel Position with Wheels Straight Ahead.
  • Front Wheel Alignment Check and Adjustment (Refer to GROUP 33 - On-vehicle Service, Front Wheel Alignment Check and Adjustment ).
  • Under Cover Installation (Refer to GROUP 51 - Under Cover ).
  • Hood Installation (Refer to GROUP 42 - Hood ).
  • Hood Clearance Adjustment (Refer to GROUP 42 - On-vehicle Service, Adjustment of Clearance Around Hood ).


Removal steps
<<A>>

1.
Engine mounting nut


2.
Engine mounting washer <6G7>


3.
Front reinforcement bar
<<B>>

4.
No.1 crossmember assembly


5.
Power steering gear and linkage


6.
Engine mounting stopper


7.
Engine mounting

REMOVAL SERVICE POINTS


<<A>> ENGINE MOUNTING NUT REMOVAL


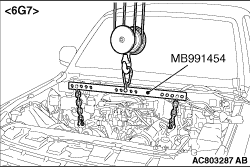
1.Using special tools engine hanger balancer (MB991454), lift the engine assembly up to where no load is applied to the engine mounting <6G7>.

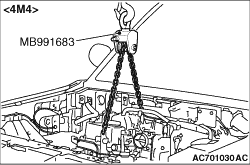
2.Using special tool sling chain set (MB991683), lift the engine assembly up to where no load is applied to the engine mounting <4M4>.
3.Remove the engine mount mounting nuts.

<<B>> No.1 CROSSMEMBER ASSEMBLY REMOVAL


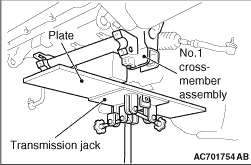
Use a transmission jack to support the No.1 crossmember and remove the No.1 crossmember.